The DHCP Offer packet actually populates the proposed IP for the client as the destination IP address:
The DHCP Request packet from the client to server still keeps the source IP as all bits off and destination IP as all bits on.. also Layer 2 addressing is the same as per original DHCP Discover packet:
It is on the DHCP Ack packet that finally Layer 2 and Layer 3 addressing is as intended:
Lesson 1 – Performing Basic Tasks from a Shell Environment
FHS = File System Handling Standard (Hard Disk should have a default layout)
man heir
Directory
Comment
/boot
Everything to boot your machine
/dev
Interfaces to your devices
~
In your home directory (cd to get here)
/etc
Configuration files (ASCII)
/usr
Program Files
/usr/bin
/usr/sbin
/usr/lib
Libraries for programs
/home
Home directories for users
/media
Mounting (Auto)
/mnt
Mounting (Manual)
/opt
Optional / Empty
/proc
Interface to the Linux kernel
/run
New / recent Linux distros (Running processes)
/srv
Services / Document root for apache for example / FTP server
/sys
Interface to hardware
/tmp
Temporary files / OS keeps track and removes files
/usr/local
Local utilities
/usr/share
Share utilities with others
/usr/src
Source Code
/var/log
Log Files
/var
Document root for Apache / FTP for example
Finding Files and Commands
Command
Usage
Comment
find
find / -name “passwd”
/ = Start at root of fs
find
find / -name “pass*”
Pass followed by anything
find
find / -user dean
Files owned by dean
locate
Faster than find as using as database database must be generated with updatedb Runs via cron daily
touch
touch TESTFILE
Create a file
whereis
whereis passwd
Locate binary, source and manual page
which
which passwd
shows full path of shell command (binaries only)
Single Shell Commands + One Line Command Sequences
Command
Comment
ls; pwd
Will run the ls command 1st and then the pwd command
cal 2029 > ~/calfile
Will run the command and direct the output to the home directory in a new file called calfile
wall
Write all – will output message to the terminal of all users
ps aux
Processes running on system
|
With a pipe you are sending the command to something else, for example ps aux | grep http
Using and Modifying the Shell Environment
bash
Will create a subshell with a defined environment
env
Show environment variables within this shell
MYHOME=/home/user
Create a variable called MYHOME with a value of /usr/share/lib
Variables are local to the active shell, they must be exported to the target subshell with the export prefix:
export TODAY=Friday bash echo $TODAY Friday
echo $MYHOME
Display the value of the MYHOME variable
cd $MYHOME
Change directory to the value of MYHOME
echo
Request content of the variable
help
Help for all internal commands
set / unset
Set or unset shell values
uname
Name of OS can be used with -a for all or -r for kernel etc..
** –help works with most commands
Using and Editing Command History
history
Long list of commands that have been inputted Survives reboot Logged into .bash_history **Any file with a dot prefix is a hidden file
#bash history

user@user-virtual-machine:/home/user$ ls -al | grep bash
-rw-------  1 user user  132 Sep 21 10:08 .bash_history
-rw-r--r--  1 user user  220 Sep 21 08:59 .bash_logout
-rw-r--r--  1 user user 3771 Sep 21 08:59 .bashrc

user@user-virtual-machine:~$ cat .bash_history
sudo -i
su
sudo bash
sudo -s
cd /
cls
clear
ls
find / -name "passwd"
su
ip a
journalctl -follow
journalctl
tail -f /var/log/syslog

user@user-virtual-machine:~$ history
    1  sudo -i
    2  su
    3  sudo bash
    4  sudo -s
    5  cd /
    6  cls
    7  clear
    8  ls
    9  find / -name "passwd"
   10  su
   11  ip a
   12  journalctl -follow
   13  journalctl
   14  tail -f /var/log/syslog
   15  ls -al
   16  cat .bash_history
   17  history

# We can reference a command using ! for example:
! 6

#CTRL+R = Reverse Search - let's search bash_history for a command we have run before such as 'find':

(reverse-i-search)`find': find / -name "passwd"
Some options with the history command:
user@user-virtual-machine:~$ history --help
history: history [-c] [-d offset] [n] or history -anrw [filename] or history -ps arg [arg...]
    Display or manipulate the history list.

    Display the history list with line numbers, prefixing each modified
    entry with a `*'.  An argument of N lists only the last N entries.

    Options:
      -c	clear the history list by deleting all of the entries
      -d offset	delete the history entry at position OFFSET. Negative
    		offsets count back from the end of the history list

      -a	append history lines from this session to the history file
      -n	read all history lines not already read from the history file
    		and append them to the history list
      -r	read the history file and append the contents to the history
    		list
      -w	write the current history to the history file

      -p	perform history expansion on each ARG and display the result
    		without storing it in the history list
      -s	append the ARGs to the history list as a single entry
Invoking Commands Inside and Outside the Defined Path
If you want to run something not in the PATH, add the full path:
#For example creating a new file called hello:
./hello

# dot = Current directory
# forward slash = path to file (Absolute path)
Internal commands using help:
user@user-virtual-machine:~$ help

GNU bash, version 5.0.17(1)-release (x86_64-pc-linux-gnu)
These shell commands are defined internally.  Type `help' to see this list.
Type `help name' to find out more about the function `name'.
Use `info bash' to find out more about the shell in general.
Use `man -k' or `info' to find out more about commands not in this list.

A star (*) next to a name means that the command is disabled.

 job_spec [&]                          history [-c] [-d offset] [n] or hi>
 (( expression ))                      if COMMANDS; then COMMANDS; [ elif>
 . filename [arguments]                jobs [-lnprs] [jobspec ...] or job>
 :                                     kill [-s sigspec | -n signum | -si>
 [ arg... ]                            let arg [arg ...]
 [[ expression ]]                      local [option] name[=value] ...
 alias [-p] [name[=value] ... ]        logout [n]
 bg [job_spec ...]                     mapfile [-d delim] [-n count] [-O >
 bind [-lpsvPSVX] [-m keymap] [-f fi>  popd [-n] [+N | -N]
 break [n]                             printf [-v var] format [arguments]
 builtin [shell-builtin [arg ...]]     pushd [-n] [+N | -N | dir]
 caller [expr]                         pwd [-LP]
 case WORD in [PATTERN [| PATTERN]..>  read [-ers] [-a array] [-d delim] >
 cd [-L|[-P [-e]] [-@]] [dir]          readarray [-d delim] [-n count] [->
 command [-pVv] command [arg ...]      readonly [-aAf] [name[=value] ...]>
 compgen [-abcdefgjksuv] [-o option]>  return [n]
 complete [-abcdefgjksuv] [-pr] [-DE>  select NAME [in WORDS ... ;] do CO>
 compopt [-o|+o option] [-DEI] [name>  set [-abefhkmnptuvxBCHP] [-o optio>
 continue [n]                          shift [n]
 coproc [NAME] command [redirections>  shopt [-pqsu] [-o] [optname ...]
 declare [-aAfFgilnrtux] [-p] [name[>  source filename [arguments]
 dirs [-clpv] [+N] [-N]                suspend [-f]
 disown [-h] [-ar] [jobspec ... | pi>  test [expr]
 echo [-neE] [arg ...]                 time [-p] pipeline
 enable [-a] [-dnps] [-f filename] [>  times
 eval [arg ...]                        trap [-lp] [[arg] signal_spec ...]
 exec [-cl] [-a name] [command [argu>  true
 exit [n]                              type [-afptP] name [name ...]
 export [-fn] [name[=value] ...] or >  typeset [-aAfFgilnrtux] [-p] name[>
 false                                 ulimit [-SHabcdefiklmnpqrstuvxPT] >
 fc [-e ename] [-lnr] [first] [last]>  umask [-p] [-S] [mode]
 fg [job_spec]                         unalias [-a] name [name ...]
 for NAME [in WORDS ... ] ; do COMMA>  unset [-f] [-v] [-n] [name ...]
 for (( exp1; exp2; exp3 )); do COMM>  until COMMANDS; do COMMANDS; done
 function name { COMMANDS ; } or nam>  variables - Names and meanings of >
 getopts optstring name [arg]          wait [-fn] [id ...]
 hash [-lr] [-p pathname] [-dt] [nam>  while COMMANDS; do COMMANDS; done
 help [-dms] [pattern ...]             { COMMANDS ; }
For example with the ‘time’ command which we know is internal as it is referenced in ‘help’:
#Time is an internal command:

user@user-virtual-machine:~$ help | grep time
time [-p] pipeline

#Run the internal time command:
user@user-virtual-machine:~$ time

real	0m0.000s
user	0m0.000s
sys	0m0.000s

# which time ?
user@user-virtual-machine:~$ which time
/usr/bin/time

#Now run this file?
user@user-virtual-machine:~$ /usr/bin/time
Usage: /usr/bin/time [-apvV] [-f format] [-o file] [--append] [--verbose]
       [--portability] [--format=format] [--output=file] [--version]
       [--quiet] [--help] command [arg...]

#It is different! Let's confirm with the 'type' command:

user@user-virtual-machine:~$ type time
time is a shell keyword

user@user-virtual-machine:~$ type /usr/bin/time
/usr/bin/time is /usr/bin/time
Lesson 2 – Processing and Working with Text Files
Streams, Pipes and Redirects
Redirect example:
root@user-virtual-machine:/# ls
bin    dev   lib    libx32      mnt   root  snap      sys  var
boot   etc   lib32  lost+found  opt   run   srv       tmp
cdrom  home  lib64  media       proc  sbin  swapfile  usr

root@user-virtual-machine:/# ls > redirectfile

root@user-virtual-machine:/# cat redirectfile
bin
boot
cdrom
dev
etc
home
lib
lib32
lib64
libx32
lost+found
media
mnt
opt
proc
redirectfile
root
run
sbin
snap
srv
swapfile
sys
tmp
usr
var
A single redirect will always overwrite the file in question, therefore to add to the file instead we can do this using ‘>>’:
#Let's add a new directory to / and then run the command to add to the file

root@user-virtual-machine:/# mkdir test

root@user-virtual-machine:/# ls
bin    dev   lib    libx32      mnt   redirectfile  sbin  swapfile  tmp
boot   etc   lib32  lost+found  opt   root          snap  sys       usr
cdrom  home  lib64  media       proc  run           srv   test      var

#Add standard output to existing file:
ls >> redirectfile

root@user-virtual-machine:/# cat redirectfile
bin
boot
cdrom
dev
etc
home
lib
lib32
lib64
libx32
lost+found
media
mnt
opt
proc
redirectfile
root
run
sbin
snap
srv
swapfile
sys
tmp
usr
var

#Standard output added below, but you can see the test directory included to see the added content of redirectfile:

bin
boot
cdrom
dev
etc
home
lib
lib32
lib64
libx32
lost+found
media
mnt
opt
proc
redirectfile
root
run
sbin
snap
srv
swapfile
sys
test
tmp
usr
var
We can do similar things with the standard error output. If we don’t want to see errors and instead output them to a file:
#Example of standard error:

user@user-virtual-machine:/$ find / -name blah
find: ‘/lost+found’: Permission denied
find: ‘/tmp/systemd-private-cb0881c892a04de299a5160c5a336163-switcheroo-control.service-rGLA6i’: Permission denied
find: ‘/tmp/tracker-extract-files.125’: Permission denied
find: ‘/tmp/snap.snap-store’: Permission denied
find: ‘/tmp/systemd-private-cb0881c892a04de299a5160c5a336163-systemd-logind.service-DEYpLi’: Permission denied
find: ‘/tmp/systemd-private-cb0881c892a04de299a5160c5a336163-upower.service-2uU90g’: Permission denied
find: ‘/tmp/systemd-private-cb0881c892a04de299a5160c5a336163-systemd-timesyncd.service-FUlR0g’: Permission denied
find: ‘/tmp/systemd-private-cb0881c892a04de299a5160c5a336163-ModemManager.service-CoyfLg’: Permission denied
find: ‘/tmp/systemd-private-cb0881c892a04de299a5160c5a336163-systemd-resolve

**I have snipped the rest of the error output

#If we dont want to see this, instead we can output to a file:

find / -name blah 2> /home/user/errorfile

#Now all error output is in the file '/home/user/errorfile'
To feed standard input we can use the <
Example is given using the ‘mail’ command:
#For example send a mail to root with the subject of HELLOTHERE, but feed the standard input with a dot:

user@user-virtual-machine:/$ mail -s HELLOTHERE root < .

#The result is that the dot is sent to the command as part of the overall command
You can also deal with standard output and standard error in the same command with ‘&>’:
How about if we want to view the standard output and also sent to a file? We can do this using the ‘tee‘ command:
user@user-virtual-machine:~$ ls | tee ls.out
dead.letter
Desktop
Documents
Downloads
errorfile
error_standard_file
Music
Pictures
Public
Templates
Videos

user@user-virtual-machine:~$ cat ls.out
dead.letter
Desktop
Documents
Downloads
errorfile
error_standard_file
Music
Pictures
Public
Templates
Videos
xargs – Take output from command and do something with it!
An example from the man file:
#Find files named core in or below the directory /tmp and delete them.  Note that this will work incorrectly if there are any file‐names containing newlines or spaces.

find /tmp -name core -type f -print | xargs /bin/rm -f
Example from course:
#Make 2 files 1blah and 2blah

user@user-virtual-machine:~$ touch 1blah
user@user-virtual-machine:~$ touch 2blah

user@user-virtual-machine:~$ ls
1blah        Desktop    errorfile            Music     Templates
2blah        Documents  error_standard_file  Pictures  Videos
dead.letter  Downloads  ls.out               Public

#Using xargs let's remove them
find / -name "*blah" | xargs -d "\n" rm

-d ensures a delimiter is put between the output

#Files are now gone:
user@user-virtual-machine:~$ ls
dead.letter  Documents  errorfile            ls.out  Pictures  Templates
Desktop      Downloads  error_standard_file  Music   Public    Videos
File Viewing Commands
cat
tac
cat run in the opposite order
cat -E
end of every line with a dollar sign
cat -T
shows tabs with a caret
cat -N
Dump cat to a file with numbers c
less
arrows up / space down and q to leave
tail
By default shows last 10 lines
tail -f
Amazing command.. live view of last 10 lines
tail -n
Number of lines to show
#Example
tail -f -n 30 /var/log/syslog
head
opposite of tail
head & tail
Can be used together!
od
Octal dump / not useful real world, mainly for exam
File Formatting Commands
fmt Formatting
fmt -w 50 /var/log/syslog (format width at 50 characters for example)
pr Convert text files for printing
cat -n /etc/passwd pr -d (Double space output)
expand convert tabs to spaces
expand /etc/hosts

user@user-virtual-machine:~$ cat expandme
convert tabs to spaces
michael scott
dwight k schrute
convert
Convert graphics files (Deprecated?)
File Formatting Commands2
join
user@user-virtual-machine:~$ cat join1
1 Michael Scott
2 Jim Halpert
user@user-virtual-machine:~$ cat join2
1 Regional Manager
2 Assistant Regional Manager

user@user-virtual-machine:~$ join join1 join2
1 Michael Scott Regional Manager
2 Jim Halpert Assistant Regional Manager
**Fields must be the same or join will not work
paste
Same as join, but will take the entire lines of each and redirect to a new file
nl
When used with a pipe, we can number lines for example:
user@user-virtual-machine:~$ cat /etc/hosts | nl
1 127.0.0.1 localhost
2 127.0.1.1 user-virtual-machine
3 # The following lines are desirable for IPv6 capable hosts
4 ::1 ip6-localhost ip6-loopback 5 fe00::0 ip6-localnet 6 ff00::0 ip6-mcastprefix 7 ff02::1 ip6-allnodes 8 ff02::2 ip6-allrouters
sed
sed – stream editor for filtering and transforming text. In this example let’s find bye and replace with BYE:
user@user-virtual-machine:~$ du -h bigfile
11M bigfile
user@user-virtual-machine:~/BIG$ ls -al total 10544 drwxrwxr-x 2 user user 4096 Sep 21 12:44 . drwxr-xr-x 16 user user 4096 Sep 21 12:44 .. -rw-rw-r-- 1 user user 10787357 Sep 21 12:42 bigfile
to save a file you need to go back to command mode
Press Escape key
:wq! (write, quit and don’t complain about anything)
vim = vi improved with additional options
/ will search
n goes to next result
Uppercase N goes back
/? looks upwards in the file
HJKL (left, up, down, right)
i = insert
o = open / new line
O = open / new line above
d = deletion of lines (v first)
u = undo
More vi commands in a help sheet:
Using Regular Expressions to Work with Text Files
#Example regular expressions

# All files in current directory for big, bag and beg:
grep b[iae]g *

# All files in current directory that contain 2 numbers with ranges:
grep [0-9][0-9] *

# Any character
grep . *

#All files in current directory, starting with and ending with:
grep ^lisa$ *

#Repetition Operators
*: zero or more of preceding character
+: one of more of preceding character
?: zero or one of preceding character

#Multiple Strings
grep cat|dog *

# Sets
grep /mydir(/.*)? *

**For the exam global overview of regex / play with and learn with grep
Searching Text Patterns with grep
#Search for michael and jim in all files
grep -E "michael|jim" *

#Ignores casing, searches michael in upper or lower case
grep -i michael *
Lesson 3: Performing Base File Management Tasks
Copying, Moving and Moving Files
#directories
mkdir
rmdir

#Create dir with parent dir
mkdir -p some/files

#copying files to current directory
cp /etc/h* .

#Recursive copy
cp -R /etc/g* .

#Delete a directory and contents
rm -rf

#List all files
ls -a

#Long listing
ls -l

#all and long
ls -al

#Move / rename
mv
Wildcards
# List all files beginning with h
ls h*

#Only directory name, no contents
ls -d h*

#Anything beginning with an a b or c
ls -d [abc]*

#Anything beginning with an a b or c, on 2nd posiotion I don't care, but 3rd position a t
ls -d [abc]?t*
Wildcards = ‘Globbing’
Other File Management Tools
command
Comment
touch
Create a file Also used to update timestamps on files
file
Will recognise contents of file and tell you what type of file it is
find
Covered in lesson one, but an important command. (Be aware of the various options with this command for the exam)
Creating Backups
tar = ‘Take Archive’
#tar examples - take backup

tar cvf (Create, verbose, file)
tar cvf /root.tar (Extension optional, but helpful)

tar cvf /mscottbackup.tar /home/mscott

mscott@user-virtual-machine:~$ ls -al | grep backup
-rw-rw-r--  1 mscott mscott 8519680 Sep 22 07:59 mscottbackup.tar

#compress backup utilities

gzip
bzip2
xz

#gzip example to compress backup archive

gzip /home/mscott/mscottbackup.tar

mscott@user-virtual-machine:~$ du -h mscottbackup.tar
8.2M	mscottbackup.tar

mscott@user-virtual-machine:~$ gzip mscottbackup.tar

mscott@user-virtual-machine:~$ du -h mscottbackup.tar.gz
788K	mscottbackup.tar.gz

#decompress example
gunzip mscottbackup.tar.gz

#compress directly with tar
tar czvf mscottbackup.tar /home/mscott/

#or maybe
tar czvf /home/mscott/backup /home/mscott/

#file command for more information on the backups
mscott@user-virtual-machine:~$ file backup
backup: gzip compressed data, from Unix, original size modulo 2^32 10096640

mscott@user-virtual-machine:~$ file mscottbackup.tar
mscottbackup.tar: gzip compressed data, from Unix, original size modulo 2^32 9308160
cpio = Another backup utility / legacy
dd = Another backup util (convert and copy)
dd works with devices and can be used to clone disks
#dd example (if = input file and of = output file)

dd if=/dev/sda1 of=/sda1.img
Analyzing and Extracting tar backups
#show contents of the backup
tar tvf BACKUPNAME

#extract a backup
tar xvf BACKUPNAME -C /restorepath

#extract a specific part of the backup
tar xvf BACKUPNAME /home/mscott/file1
Understanding Links and Inodes
Data stored in blocks
Collection of blocks = a file
inode = administrative data / per file
all inodes are numbered
On Linux FS we work with filenames
One way, filename is aware of inode, not the other way around
Each name is a ‘hard link’
Symbolic Link
Symbolic Link doesn’t point to the inode directly, instead points to a filename
If file is deleted then the symbolic link is invalid
Managing Hard and Symbolic Links
Let’s create a copy of a file to work with and confirm the inode number:
#ln - make links between files
ln users hard

#Edit the users file and verify the inode / size
root@user-virtual-machine:/# ls -il users hard
20 -rw-r--r-- 2 root root 2953 Sep 22 08:29 hard
20 -rw-r--r-- 2 root root 2953 Sep 22 08:29 users

(The inode is 20 for both and then size is 2953)

#Add text to users file and verify both files

root@user-virtual-machine:/# echo blahblahblah >> users

root@user-virtual-machine:/# ls -il users hard
20 -rw-r--r-- 2 root root 2966 Sep 22 08:34 hard
20 -rw-r--r-- 2 root root 2966 Sep 22 08:34 users

(Notice that both files share the inode number and the size has changed on both files. This is because they are a hard link.)
#Create a symbolic link
ln -s hard symlink

#Verify
ls -il users hard symlink
20 -rw-r--r-- 2 root root 2966 Sep 22 08:34 hard
21 lrwxrwxrwx 1 root root    4 Sep 22 08:37 symlink -> hard
20 -rw-r--r-- 2 root root 2966 Sep 22 08:34 users

(Notice the inode number is different and also the size)

#Delete hard file and confirm symlink status
root@user-virtual-machine:/# rm hard

root@user-virtual-machine:/# ls -il users symlink
21 lrwxrwxrwx 1 root root    4 Sep 22 08:37 symlink -> hard
20 -rw-r--r-- 1 root root 2966 Sep 22 08:34 users

(The symlink actually changes colour to red to indicate it's a broken link)

#Recreate the hard link to fix the issue
ln users hard

(Symlink is now healthy and shown in blue on my terminal)
Lesson 4 – Managing Processes
Running Jobs in Foreground and Background
#What jobs are running?

root@user-virtual-machine:/# jobs
root@user-virtual-machine:/#

None!

#Start a job and temporarily stop it with Ctrl + Z
root@user-virtual-machine:/# sleep 3600
^Z

#Job 1 is now stopped in the background
root@user-virtual-machine:/# jobs
[1]+  Stopped                 sleep 3600

#background job
root@user-virtual-machine:/# bg 1
[1]+ sleep 3600 &

#Bring to fg
root@user-virtual-machine:/# fg 1
sleep 3600

#Stop fg job with Ctrl + C
root@user-virtual-machine:/# fg 1
sleep 3600
^C

#Create jobs and send to background
root@user-virtual-machine:/# sleep 3600 &
[1] 3118
root@user-virtual-machine:/# sleep 4600 &
[2] 3119
root@user-virtual-machine:/# sleep 5600 &
[3] 3120

#Verify jobs
root@user-virtual-machine:/# jobs
[1]   Running                 sleep 3600 &
[2]-  Running                 sleep 4600 &
[3]+  Running                 sleep 5600 &

#Jobs are in the background
root@user-virtual-machine:/# bg 1
bash: bg: job 1 already in background
root@user-virtual-machine:/# bg 2
bash: bg: job 2 already in background
root@user-virtual-machine:/# bg 3
bash: bg: job 3 already in background

#Bring to fg and stop job
root@user-virtual-machine:/# fg 1
sleep 3600
^C

#Verify Job 1 has now fully stopped
root@user-virtual-machine:/# jobs
[2]-  Running                 sleep 4600 &
[3]+  Running                 sleep 5600 &
nohup (If parent shell is disconnected, will continue regardless)
#man nohup
nohup - run a command immune to hangups, with output to a non-tty
screen – this command was also mentioned, but the instructor said it was too complicated to demo? Ive installed it to my Ubuntu desktop and the man entry:
#Install screen
sudo apt install screen

#What is screen?
man screen
'screen - screen manager with VT100/ANSI terminal emulation'
CBT Nuggets video on this:
#screen

#Type screen followed by enter
screen

#Screen is now running:
user@user-virtual-machine:~$ ps aux | grep screen
user        5387  0.0  0.0  18060  3140 pts/4    S+   09:21   0:00 screen

#Run a ping for example to google.com and detach screen

Ctrl + A
D

#You are now detached

#Reattach to screen
screen -dr

#You are now reconnected to the ping. Pretty cool and look like there is of course more to the command, but for now this is enough
Sending Signals to Processes
#Let's send 3 jobs to the background

user@user-virtual-machine:~$ sleep 3600 &
[1] 5659
user@user-virtual-machine:~$ sleep 4600 &
[2] 5660
user@user-virtual-machine:~$ sleep 5600 &
[3] 5661

#Here they are

user@user-virtual-machine:~$ ps aux | grep sleep
user        5659  0.0  0.0  16716   584 pts/4    S    09:57   0:00 sleep 3600
user        5660  0.0  0.0  16716   584 pts/4    S    09:57   0:00 sleep 4600
user        5661  0.0  0.0  16716   584 pts/4    S    09:57   0:00 sleep 5600

#We can kill the processes for example
kill 5659

or...

#killall - start 3 new processes

user@user-virtual-machine:~$ sleep 3600 &
[1] 5682
user@user-virtual-machine:~$ sleep 3600 &
[2] 5683
user@user-virtual-machine:~$ sleep 3600 &
[3] 5684

user@user-virtual-machine:~$ killall sleep
[1]   Terminated              sleep 3600
[2]-  Terminated              sleep 3600
[3]+  Terminated              sleep 3600
pkill = You can also kill within the top command with ‘k’
Monitoring processes with top
Lesson is really just a walkthrough of the output of top
#sample top output

top - 10:11:11 up  3:02,  3 users,  load average: 0.13, 0.05, 0.04
Tasks: 304 total,   1 running, 303 sleeping,   0 stopped,   0 zombie
%Cpu(s):  0.0 us,  0.5 sy,  0.0 ni, 99.5 id,  0.0 wa,  0.0 hi,  0.0 si,  0.0 st
MiB Mem :   3901.4 total,   1185.1 free,   1179.3 used,   1537.1 buff/cache
MiB Swap:   1162.4 total,   1162.4 free,      0.0 used.   2450.0 avail Mem

    PID USER      PR  NI    VIRT    RES    SHR S  %CPU  %MEM     TIME+ COMMAND
    779 root      20   0  778800  29772  16524 S   0.3   0.7   0:02.75 snapd
   5460 user      20   0   18476   2832   2644 S   0.3   0.1   0:01.74 ping
   6441 user      20   0   20780   4248   3328 R   0.3   0.1   0:00.05 top
      1 root      20   0  103268  12696   8344 S   0.0   0.3   0:03.68 systemd
      2 root      20   0       0      0      0 S   0.0   0.0   0:00.01 kthreadd
      3 root       0 -20       0      0      0 I   0.0   0.0   0:00.00 rcu_gp
      4 root       0 -20       0      0      0 I   0.0   0.0   0:00.00 rcu_par_gp
      6 root       0 -20       0      0      0 I   0.0   0.0   0:00.00 kworker/0:0H-event+
      9 root       0 -20       0      0      0 I   0.0   0.0   0:00.00 mm_percpu_wq
     10 root      20   0       0      0      0 S   0.0   0.0   0:00.00 rcu_tasks_rude_
     11 root      20   0       0      0      0 S   0.0   0.0   0:00.00 rcu_tasks_trace
     12 root      20   0       0      0      0 S   0.0   0.0   0:00.22 ksoftirqd/0
     13 root      20   0       0      0      0 I   0.0   0.0   0:01.67 rcu_sched
     14 root      rt   0       0      0      0 S   0.0   0.0   0:00.09 migration/0
     15 root     -51   0       0      0      0 S   0.0   0.0   0:00.00 idle_inject/0
     16 root      20   0       0      0      0 S   0.0   0.0   0:00.00 cpuhp/0
     17 root      20   0       0      0      0 S   0.0   0.0   0:00.00 cpuhp/1
     18 root     -51   0       0      0      0 S   0.0   0.0   0:00.00 idle_inject/1
     19 root      rt   0       0      0      0 S   0.0   0.0   0:00.26 migration/1
     20 root      20   0       0      0      0 S   0.0   0.0   0:00.59 ksoftirqd/1
     22 root       0 -20       0      0      0 I   0.0   0.0   0:00.00 kworker/1:0H-event+
     23 root      20   0       0      0      0 S   0.0   0.0   0:00.00 kdevtmpfs
     24 root       0 -20       0      0      0 I   0.0   0.0   0:00.00 netns
     25 root       0 -20       0      0      0 I   0.0   0.0   0:00.00 inet_frag_wq
     26 root      20   0       0      0      0 S   0.0   0.0   0:00.00 kauditd
     28 root      20   0       0      0      0 S   0.0   0.0   0:00.02 khungtaskd
Selecting and Sorting Processes with ps and Related Utilities
ps fax shows parent and child processes: (Also pstree)
pgrep can be used to find processes for a specific user
How about what processes and what user? pgrep can help:
Understanding Process Priority
Queue -> Scheduler -> CPU 0 / CPU 1
Default priority of processes is 20 (lower is better)
Therefore all processes are equal in the queue
you can change process priority using the nice command
nice – run a program with modified scheduling priority
There are also real time processes that have priority over everything
From man nice:
Run COMMAND with an adjusted niceness, which affects process scheduling.  With no COMMAND, print the current niceness.

Niceness values range from -20  (most favorable to the process) to 19 (least favorable to the process).
Changing Process Priority
Priority from top
From top we can use the ‘r’ command a process and use -5 as a nice value:
We can see the NI column and value and the resulting priority of 15.
We can also do this against the process we run:
nice -n 5 sleep 3600 &
The sleep process is now running in the background with priority 25 instead of the default 20.
Or another example:
nice -n 5 nano &
Verify with htop:
We can also use renice to change the priority of an existing job:
user@user-virtual-machine:~$ ps aux | grep nano
user        7040  0.0  0.0  17872  3380 pts/1    TN   11:05   0:00 nano
user        7067  0.0  0.0  17544   660 pts/1    S+   11:10   0:00 grep --color=auto nano

user@user-virtual-machine:~$ renice -n -15 7040
7040 (process ID) old priority 5, new priority -15
Lesson 5: Design Hard Disk Layout
Allocating Filesystems and Swap Space
df commanddf -h and df-hT
Also we can use fdisk:
user@user-virtual-machine:~$ sudo fdisk -l
[sudo] password for user:

Disk /dev/loop0: 55.45 MiB, 58130432 bytes, 113536 sectors
Units: sectors of 1 * 512 = 512 bytes
Sector size (logical/physical): 512 bytes / 512 bytes
I/O size (minimum/optimal): 512 bytes / 512 bytes


Disk /dev/loop1: 219 MiB, 229638144 bytes, 448512 sectors
Units: sectors of 1 * 512 = 512 bytes
Sector size (logical/physical): 512 bytes / 512 bytes
I/O size (minimum/optimal): 512 bytes / 512 bytes


Disk /dev/loop2: 65.1 MiB, 68259840 bytes, 133320 sectors
Units: sectors of 1 * 512 = 512 bytes
Sector size (logical/physical): 512 bytes / 512 bytes
I/O size (minimum/optimal): 512 bytes / 512 bytes


Disk /dev/loop3: 50.98 MiB, 53432320 bytes, 104360 sectors
Units: sectors of 1 * 512 = 512 bytes
Sector size (logical/physical): 512 bytes / 512 bytes
I/O size (minimum/optimal): 512 bytes / 512 bytes


Disk /dev/loop4: 32.3 MiB, 33865728 bytes, 66144 sectors
Units: sectors of 1 * 512 = 512 bytes
Sector size (logical/physical): 512 bytes / 512 bytes
I/O size (minimum/optimal): 512 bytes / 512 bytes


Disk /dev/loop5: 32.31 MiB, 33869824 bytes, 66152 sectors
Units: sectors of 1 * 512 = 512 bytes
Sector size (logical/physical): 512 bytes / 512 bytes
I/O size (minimum/optimal): 512 bytes / 512 bytes


#/dev/sda is very interesting to see here as this is the 25GB disk I have to the Ubuntu VM:

Disk /dev/sda: 25 GiB, 26843545600 bytes, 52428800 sectors
Disk model: VMware Virtual S
Units: sectors of 1 * 512 = 512 bytes
Sector size (logical/physical): 512 bytes / 512 bytes
I/O size (minimum/optimal): 512 bytes / 512 bytes
Disklabel type: dos
Disk identifier: 0xb99ccae9

Device     Boot   Start      End  Sectors  Size Id Type
/dev/sda1  *       2048  1050623  1048576  512M  b W95 FAT32
/dev/sda2       1052670 52426751 51374082 24.5G  5 Extended
/dev/sda5       1052672 52426751 51374080 24.5G 83 Linux

#Cross reference with output from df:

user@user-virtual-machine:~$ df -hT | grep sda
/dev/sda5      ext4       24G  8.1G   15G  36% /
/dev/sda1      vfat      511M  4.0K  511M   1% /boot/efi

(sda5 is a ext4 type)
Tailoring the Design to the Intended Use of the System
/var is a candidate to mount to another disk
/home also another candidate
Ensuring the /boot Partition Conforms to the Hardware Architecture
/boot and Disk Layout
Understanding LVM Features
Logical Volume Manager / storage organised in a different way
High level knowledge only for LPIC-1
VG = Volume Group (Abstraction of all storage)
PV = Physical Volume (Within Volume Group) (Disk)
LV = Logical Volume (Made from Volume Groups)
With a LVM environment we can easily add a PV to the VG to easily increase space
You cant put entire server into LVM
/boot must be seen from MBR / GUID table
Always on a traditional partition
/boot = sda1
pv = sda2
Lesson 6: Creating Partitions and Filesystems
Understanding GPT and MBR differences
#create partition with fdisk - check partitions

user@user-virtual-machine:~$ cat /proc/partitions
major minor  #blocks  name

   7        0      56768 loop0
   7        1     224256 loop1
   7        2      66660 loop2
   7        3      52180 loop3
   7        4      33072 loop4
   7        5      33076 loop5
  11        0    2999936 sr0
   8        0   26214400 sda
   8        1     524288 sda1
   8        2          1 sda2
   8        5   25687040 sda5

user@user-virtual-machine:~$ sudo fdisk /dev/sda
[sudo] password for user:

Welcome to fdisk (util-linux 2.34).
Changes will remain in memory only, until you decide to write them.
Be careful before using the write command.


Command (m for help): m

#help for fdisk

Help:

  DOS (MBR)
   a   toggle a bootable flag
   b   edit nested BSD disklabel
   c   toggle the dos compatibility flag

  Generic
   d   delete a partition
   F   list free unpartitioned space
   l   list known partition types
   n   add a new partition
   p   print the partition table
   t   change a partition type
   v   verify the partition table
   i   print information about a partition

  Misc
   m   print this menu
   u   change display/entry units
   x   extra functionality (experts only)

  Script
   I   load disk layout from sfdisk script file
   O   dump disk layout to sfdisk script file

  Save & Exit
   w   write table to disk and exit
   q   quit without saving changes

  Create a new label
   g   create a new empty GPT partition table
   G   create a new empty SGI (IRIX) partition table
   o   create a new empty DOS partition table
   s   create a new empty Sun partition table
BTW – What is the deal with sda1??
SCSI
DISK
DISKA
Partition Number
Managing MBR Primary Partition Tables with fdisk
There are three types of partitions with which you will be dealing; Primary, Extended, and Logical partitions.
MBR = classical way of creating partitions on a disk / has limitations
Wont go beyond 2TB
Therefore use GPD.. uses GUID based tables
Use gdisk or parted
Basic Knowledge of gdisk and parted with GPT
gdisk:
#Confirm with gdisk we are using MBR not GPT

user@user-virtual-machine:~$ sudo gdisk /dev/sda
GPT fdisk (gdisk) version 1.0.5

Partition table scan:
  MBR: MBR only
  BSD: not present
  APM: not present
  GPT: not present


***************************************************************
Found invalid GPT and valid MBR; converting MBR to GPT format
in memory. THIS OPERATION IS POTENTIALLY DESTRUCTIVE! Exit by
typing 'q' if you don't want to convert your MBR partitions
to GPT format!
***************************************************************
Creating a Filesystem
mkfs
user@user-virtual-machine:~$ mkfs
mkfs         mkfs.cramfs  mkfs.ext3    mkfs.fat     mkfs.msdos   mkfs.vfat
mkfs.bfs     mkfs.ext2    mkfs.ext4    mkfs.minix   mkfs.ntfs

#example of this command to make a ext4 fs on a newly created partition
sudo mkfs.ext4 -L datavol /dev/sda3
user@user-virtual-machine:/$ fsck --help

Usage:
 fsck [options] -- [fs-options] [<filesystem> ...]

Check and repair a Linux filesystem.

Options:
 -A         check all filesystems
 -C [<fd>]  display progress bar; file descriptor is for GUIs
 -l         lock the device to guarantee exclusive access
 -M         do not check mounted filesystems
 -N         do not execute, just show what would be done
 -P         check filesystems in parallel, including root
 -R         skip root filesystem; useful only with '-A'
 -r [<fd>]  report statistics for each device checked;
            file descriptor is for GUIs
 -s         serialise the checking operations
 -T         do not show the title on startup
 -t <type>  specify filesystem types to be checked;
            <type> is allowed to be a comma-separated list
 -V         explain what is being done

 -?, --help     display this help
     --version  display version

See the specific fsck.* commands for available fs-options.
For more details, see fsck(8).
Lesson 7 Common Filesystem Management Tasks
Filesystem Mounts
df – h to help us see current mounts
Mounting Filesystems
Filesystem Lab
I did a small lab on this to fully grasp the concepts. Here are the steps:
Add disk and confirm in /proc/partitions
Create filesystem
Mount the disk to a new directory
Using VMWare Player – Add an additional Hard Disk to my virtual Ubuntu machine of 2GB size
Disk /dev/sdb: 2 GiB, 2147483648 bytes, 4194304 sectors
Disk model: VMware Virtual S
Units: sectors of 1 * 512 = 512 bytes
Sector size (logical/physical): 512 bytes / 512 bytes
I/O size (minimum/optimal): 512 bytes / 512 bytes
Disklabel type: dos
Disk identifier: 0xf5753943

Device     Boot Start     End Sectors Size Id Type
/dev/sdb1        2048 4194303 4192256   2G 83 Linux
Now we need to create a filesystem using mkfs:
root@user-virtual-machine:/home/user# mkfs.ext4 -L NEWDISK /dev/sdb1

mke2fs 1.45.5 (07-Jan-2020)
Creating filesystem with 524032 4k blocks and 131072 inodes
Filesystem UUID: 0c89e789-0654-4e59-89f2-ef250afd2039
Superblock backups stored on blocks:
	32768, 98304, 163840, 229376, 294912

Allocating group tables: done
Writing inode tables: done
Creating journal (8192 blocks): done
Writing superblocks and filesystem accounting information: done
Now we need to mount the disk / partition.
Mount the new disk
root@user-virtual-machine:/home/user# mount --help

Usage:
 mount [-lhV]
 mount -a [options]
 mount [options] [--source] <source> | [--target] <directory>
 mount [options] <source> <directory>
 mount <operation> <mountpoint> [<target>]

#mkdir for mount
root@user-virtual-machine:/# mkdir DISK

#mount to dir
mount /dev/sdb1 DISK/

#verify
root@user-virtual-machine:/DISK# df -h | grep sdb
/dev/sdb1       2.0G  6.0M  1.9G   1% /DISK
Done!
Also you can remove with umount
root@user-virtual-machine:/DISK# touch file1

root@user-virtual-machine:~# umount /DISK

#The dirwill vanish.. but if you mount again the dir comes back and the files are intact

root@user-virtual-machine:/DISK# ls -al
total 24
drwxr-xr-x  3 root root  4096 Sep 22 13:49 .
drwxr-xr-x 21 root root  4096 Sep 22 13:49 ..
-rw-r--r--  1 root root     0 Sep 22 13:49 file1
drwx------  2 root root 16384 Sep 22 13:40 lost+found
#media used for portable devices for example a cdrom (My ubuntu media)
root@user-virtual-machine:/# ls -al | grep media
drwxr-xr-x   3 root root       4096 Sep 22 11:24 media

root@user-virtual-machine:/# cd media/

root@user-virtual-machine:/media# ls -al
total 12
drwxr-xr-x   3 root root 4096 Sep 22 11:24 .
drwxr-xr-x  21 root root 4096 Sep 22 13:49 ..
drwxr-x---+  3 root root 4096 Sep 22 13:31 user

root@user-virtual-machine:/media# cd user

root@user-virtual-machine:/media/user# ls -al
total 10
drwxr-x---+ 3 root root 4096 Sep 22 13:31  .
drwxr-xr-x  3 root root 4096 Sep 22 11:24  ..
dr-xr-xr-x  1 user user 2048 Aug 19 12:01 'Ubuntu 20.04.3 LTS amd64'

root@user-virtual-machine:/media/user# cd Ubuntu\ 20.04.3\ LTS\ amd64/

root@user-virtual-machine:/media/user/Ubuntu 20.04.3 LTS amd64# ls -al
total 109
dr-xr-xr-x  1 user user  2048 Aug 19 12:01 .
drwxr-x---+ 3 root root  4096 Sep 22 13:31 ..
dr-xr-xr-x  1 user user  2048 Aug 19 12:01 boot
dr-xr-xr-x  1 user user  2048 Aug 19 12:01 casper
dr-xr-xr-x  1 user user  2048 Aug 19 12:01 .disk
dr-xr-xr-x  1 user user  2048 Aug 19 11:59 dists
dr-xr-xr-x  1 user user  2048 Aug 19 12:01 EFI
dr-xr-xr-x  1 user user  2048 Aug 19 12:01 install
dr-xr-xr-x  1 user user 34816 Aug 19 12:01 isolinux
-r--r--r--  1 user user 53487 Aug 19 12:03 md5sum.txt
dr-xr-xr-x  1 user user  2048 Aug 19 11:59 pool
dr-xr-xr-x  1 user user  2048 Aug 19 11:59 preseed
lr-xr-xr-x  1 user user     1 Aug 19 11:59 ubuntu -> .

root@user-virtual-machine:/media/user/Ubuntu 20.04.3 LTS amd64#


#mnt is a temp location for mounting
root@user-virtual-machine:/# ls -al | grep mnt
drwxr-xr-x   2 root root       4096 Aug 19 11:29 mnt
Configuring Filesystem Mounting on Boot
Add a mount automatically with fstab:
#fstab

# /etc/fstab: static file system information.
#
# Use 'blkid' to print the universally unique identifier for a
# device; this may be used with UUID= as a more robust way to name devices
# that works even if disks are added and removed. See fstab(5).
#

# <file system> <mount point>   <type>  <options>       <dump>  <pass>

# / was on /dev/sda5 during installation
UUID=97aaa6dd-0a58-4bba-8fbc-1714307b2455 /               ext4    errors=remount-ro 0       1

# /boot/efi was on /dev/sda1 during installation
UUID=0157-CD82  /boot/efi       vfat    umask=0077      0       1
/swapfile                                 none            swap    sw              0       0
Normally done via root, but suppose you want users to do the mount. Done via fstab as per screencap:
Old way of doing this
Disk Quotas
Quotas are user based not directory based
Soft Limit = trigger a warning / nothing is blocked / clean up time is grace time
Hard Limit = nothing you can do
Managing Disk Quotas
Firstly install the quote package using apt
apt install quota
#I will use the existing NEWDISK disk setup, but edit options in fstab to enable the quotas

root@user-virtual-machine:/home# cat /etc/fstab | grep sdb
/dev/sdb1	/NEWDISK	ext4	defaults,usrquota,grpquota	1	2

#Assign dirty permissions for a test user to this directory

root@user-virtual-machine:/home# chmod 777 /NEWDISK

#quotacheck (lots of options!) scan a filesystem for disk usage, create, check and repair quota files

root@user-virtual-machine:/NEWDISK# quotacheck -mavug
quotacheck: Your kernel probably supports journalled quota but you are not using it. Consider switching to journalled quota to avoid running quotacheck after an unclean shut-down.
quotacheck: Scanning /dev/sdb1 [/NEWDISK] done
quotacheck: Cannot stat old user quota file /NEWDISK/aquota.user: No such file or directory. Usage will not be subtracted.
quotacheck: Cannot stat old group quota file /NEWDISK/aquota.group: No such file or directory. Usage will not be subtracted.
quotacheck: Cannot stat old user quota file /NEWDISK/aquota.user: No such file or directory. Usage will not be subtracted.
quotacheck: Cannot stat old group quota file /NEWDISK/aquota.group: No such file or directory. Usage will not be subtracted.
quotacheck: Checked 3 directories and 1 files
quotacheck: Old file not found.
quotacheck: Old file not found.

#verify that user and group quota files exist in the directory
root@user-virtual-machine:/NEWDISK# ls -al
total 40
drwxrwxrwx  3 root root  4096 Sep 22 14:45 .
drwxr-xr-x 22 root root  4096 Sep 22 14:07 ..
-rw-------  1 root root  6144 Sep 22 14:45 aquota.group
-rw-------  1 root root  6144 Sep 22 14:45 aquota.user
-rw-r--r--  1 root root     0 Sep 22 13:51 file1
drwx------  2 root root 16384 Sep 22 13:40 lost+found
#more verify
root@user-virtual-machine:/NEWDISK# quota -vu jhalpert
Disk quotas for user jhalpert (uid 1001):
     Filesystem  blocks   quota   limit   grace   files   quota   limit   grace
      /dev/sdb1       0       0       0               0       0       0

**Nothing set yet!

#enable quotas on
quotaon -a
#edit quota
edquota -u jhalpert
Added soft and hard limits of 1000 (1MB)
#become jhalpert and attempt to breach quota

su jhalpert
Using dd tool to backup /dev/zero with a new file called BIGFILE and a block size of 1M x 3 (which will breach 1MB)
#confirm quotas

root@user-virtual-machine:/dev# repquota -a
*** Report for user quotas on device /dev/sdb1
Block grace time: 7days; Inode grace time: 7days
                        Block limits                File limits
User            used    soft    hard  grace    used  soft  hard  grace
----------------------------------------------------------------------
root      --      20       0       0              3     0     0
jhalpert  --    1000    1000    1000              1     0     0
Lesson 8: Managing Permissions
jhalpert@user-virtual-machine:/$ id
uid=1001(jhalpert) gid=1001(jhalpert) groups=1001(jhalpert)

root@user-virtual-machine:/home# id mscott
uid=1002(mscott) gid=1002(mscott) groups=1002(mscott)

jhalpert@user-virtual-machine:/$ cat /etc/passwd | grep jhalpert
jhalpert:x:1001:1001:,,,:/home/jhalpert:/bin/bash

jhalpert@user-virtual-machine:/$ cd /home/jhalpert/

jhalpert@user-virtual-machine:~$ touch file1

jhalpert@user-virtual-machine:~$ ls -al file1
-rw-rw-r-- 1 jhalpert jhalpert 0 Sep 22 15:26 file1
Structure to permissions:
owner-group-others
**others also known as ‘world’
Understanding File Ownership
#demo

root@user-virtual-machine:/home# groupadd sales

root@user-virtual-machine:/home# cat /etc/group | grep sales
sales:x:1003:mscott,jhalpert

root@user-virtual-machine:/home# id mscott
uid=1002(mscott) gid=1002(mscott) groups=1002(mscott),1003(sales)

root@user-virtual-machine:/home# id jhalpert
uid=1001(jhalpert) gid=1001(jhalpert) groups=1001(jhalpert),1003(sales)

=================
#create test sales directory

root@user-virtual-machine:/# mkdir -p /group/sales

root@user-virtual-machine:/# cd /group/

root@user-virtual-machine:/group# ls -al
total 12
drwxr-xr-x  3 root root 4096 Sep 22 15:34 .
drwxr-xr-x 23 root root 4096 Sep 22 15:34 ..
drwxr-xr-x  2 root root 4096 Sep 22 15:34 sales

#change group ownership with chgrp or chown

root@user-virtual-machine:/group# chgrp sales sales

or...

root@user-virtual-machine:/group# chown :sales sales
root@user-virtual-machine:/group# ls -al
total 12
drwxr-xr-x  3 root root  4096 Sep 22 15:34 .
drwxr-xr-x 23 root root  4096 Sep 22 15:34 ..
drwxr-xr-x  2 root sales 4096 Sep 22 15:34 sales

#change user ownership with chown

root@user-virtual-machine:/group# chown mscott sales
root@user-virtual-machine:/group# ls -al
total 12
drwxr-xr-x  3 root   root  4096 Sep 22 15:34 .
drwxr-xr-x 23 root   root  4096 Sep 22 15:34 ..
drwxr-xr-x  2 mscott sales 4096 Sep 22 15:34 sales

or...

root@user-virtual-machine:/group# chown mscott:sales sales/

#prove the behaviour as jhalpert

root@user-virtual-machine:/group# su jhalpert

jhalpert@user-virtual-machine:/group$ pwd
/group

jhalpert@user-virtual-machine:/group$ ls -al
total 12
drwxr-xr-x  3 root   root  4096 Sep 22 15:34 .
drwxr-xr-x 23 root   root  4096 Sep 22 15:34 ..
drwxr-xr-x  2 mscott sales 4096 Sep 22 15:34 sales

jhalpert@user-virtual-machine:/group$ cd sales/

jhalpert@user-virtual-machine:/group/sales$ touch test1
touch: cannot touch 'test1': Permission denied

(jhalpert can't write to this directory as he is not the owner and is using the group read and execute permissions only)
Understanding rwx permissions
Read
Write
Execute
file
directory
Read
read
ls
Write
modify
add/delete
Execute
run
cd
Ownership on a directory is what takes precedence
Read permissions on a directory enables you to see the directory
Managing Access Permissions on Regular and Special Files and Directories
#chmod absolute mode (user/group/others)

chmod 770 directoryname or file

read 4
write 2
execute 1

#chmod relative mode

chmod o-w,g+w sales

(Never used this mode!)

#easily make a file executable

chmod +x runmefile
./runmefile
8.5 Understanding Special Permissions
file
directory
SUID
run as owner
not used
SGID
run as group owner
inherit group owner of directory
stickybit
not used on Linux (to do with caching length on old servers)
delete only if owner / delete files that users have created
Using Access Modes such as SUID, SGID, and Sticky Bit
SUID
#SUID

#So lets create a simple script as root:
root@user-virtual-machine:/learningscripts# cat echoscript1
echo Hello there

#In it's default state it is not executable:
root@user-virtual-machine:/learningscripts# ls -al
total 12
drwxr-xr-x  2 root root 4096 Sep 23 10:08 .
drwxr-xr-x 24 root root 4096 Sep 23 10:07 ..
-rw-r--r--  1 root root   17 Sep 23 10:08 echoscript1

#Let's make it executable:
root@user-virtual-machine:/learningscripts# chmod +x echoscript1

#Verify
root@user-virtual-machine:/learningscripts# ls -al
total 12
drwxr-xr-x  2 root root 4096 Sep 23 10:08 .
drwxr-xr-x 24 root root 4096 Sep 23 10:07 ..
-rwxr-xr-x  1 root root   17 Sep 23 10:08 echoscript1

root@user-virtual-machine:/learningscripts# ./echoscript1
Hello there

#What about if we want to run this as jhalpert? Well of course it will run as this user has execute permissions as 'other'. If the script is setup to go and do things in the filesystem that jhalpert doesn't have permission to? Well this is where we can run as owner with SUID:

chmod u+s echoscript1
Lets verify with a screenshot:
Here we can see the addition of the S flag into the user permissions. Now when the script is run as jhalpert, it has the permissions of root, as root is the owner of the file.
SGID
Without this special permission, any file that is created by a user of a group will be owned by the user and their group. Which will not work well for a shared directory for sales for example.
root@user-virtual-machine:/group# chmod 774 sales/

jhalpert@user-virtual-machine:/group$ ls -al
total 12
drwxr-xr-x  3 root   root  4096 Sep 22 15:34 .
drwxr-xr-x 24 root   root  4096 Sep 23 10:07 ..
drwxrwsr--  2 mscott sales 4096 Sep 23 10:23 sales

#The sales permissions now have a S on the group permissions. What does this mean? Well let's create a file as jhalpert in the sales directory:

jhalpert@user-virtual-machine:/group/sales$ touch file1

jhalpert@user-virtual-machine:/group/sales$ ls -al
total 8
drwxrwsr-- 2 mscott   sales 4096 Sep 23 10:23 .
drwxr-xr-x 3 root     root  4096 Sep 22 15:34 ..
-rw-rw-r-- 1 jhalpert sales    0 Sep 23 10:23 file1

#Notice that the permissions are now set correctly as jhalpert for the owner and more importantly sales are the group.

#This will also apply for setting up sub directories.
Sticky Bit
#sticky bit - only the owner can delete files created with a group permission

root@user-virtual-machine:/group# ls -al
total 12
drwxr-xr-x  3 root   root  4096 Sep 22 15:34 .
drwxr-xr-x 24 root   root  4096 Sep 23 10:07 ..
drwxrwsr--  2 mscott sales 4096 Sep 23 10:23 sales

root@user-virtual-machine:/group# chmod o+t sales

root@user-virtual-machine:/group# ls -al
total 12
drwxr-xr-x  3 root   root  4096 Sep 22 15:34 .
drwxr-xr-x 24 root   root  4096 Sep 23 10:07 ..
drwxrwsr-T  2 mscott sales 4096 Sep 23 10:23 sales

#Notice the T added on the 'other' permissions.

#Let's test the theory..

jhalpert@user-virtual-machine:/group/sales$ touch file1

jhalpert@user-virtual-machine:/group/sales$ ls -al
total 8
drwxrwsr-T 2 mscott   sales 4096 Sep 23 10:34 .
drwxr-xr-x 3 root     root  4096 Sep 22 15:34 ..
-rw-rw-r-- 1 jhalpert sales    0 Sep 23 10:23 file1

#Let's become phalpert and try to delete file1:

root@user-virtual-machine:/group# su phalpert
phalpert@user-virtual-machine:/group$

#bingo we are denied:
phalpert@user-virtual-machine:/group$ cd sales/

phalpert@user-virtual-machine:/group/sales$ ls -al
total 8
drwxrwsr-T 2 mscott   sales 4096 Sep 23 10:35 .
drwxr-xr-x 3 root     root  4096 Sep 22 15:34 ..
-rw-rw-r-- 1 jhalpert sales    0 Sep 23 10:23 file1

phalpert@user-virtual-machine:/group/sales$ rm file1
rm: cannot remove 'file1': Operation not permitted
PS dont forget we had to add phalpert to the sales group:
chmod in absolute mode
for example.. 1st digit used to set the special permissions
chmod 4770 sales
Need to go back to this and confirm the absolute mode as the example wasn’t clear.
Modify the File Creation Mask
#umask - default permissions
root@user-virtual-machine:/group/sales# umask
0022

#number is a subtraction from the below values:
666 = default files
777 = default directories

#Subtraction math:
666-0022 = 644
777-0022 = 755

**Ignore the zero, this is used for special permissions

#You can change the umask:
jhalpert@user-virtual-machine:/group/sales$ umask 0003

jhalpert@user-virtual-machine:/group/sales$ umask
0003

#bashrc is where the umask can be set permanently (not needed for exam)
Lesson 9: Managing Software
Understanding Packages and Meta Package Handlers
Solution for ‘dependency hell’ = Meta Package Handler -> Repository
Repo checked for dependency
Red Hat = yum
Ubuntu = apt
Solution behind the above is always the same.
Understanding Variations in Linux Software Management
2 different kinds of package management:
Debian – deb
Redhat – rpm
Other distributions are following Debian and Redhat:
Installing, Reinstalling, Upgrading and Removing Packages using RPM and YUM
user@user-virtual-machine:/dev$ ls -l | grep sd
brw-rw----  1 root disk      8,   0 Sep 23 14:28 sda
brw-rw----  1 root disk      8,   1 Sep 23 14:28 sda1
brw-rw----  1 root disk      8,   2 Sep 23 14:28 sda2
brw-rw----  1 root disk      8,   5 Sep 23 14:28 sda5
brw-rw----  1 root disk      8,  16 Sep 23 14:28 sdb
brw-rw----  1 root disk      8,  17 Sep 23 14:28 sdb1
Coldplug and Hotplug Devices
udevadm
#How to monitor hotplug devices:

user@user-virtual-machine:/$ udevadm monitor
monitor will print the received events for:
UDEV - the event which udev sends out after rule processing
KERNEL - the kernel uevent
Providing Commands to the Boot Loader and Options to the Kernel at Boot Time
user@user-virtual-machine:/etc/default$ cat grub
# If you change this file, run 'update-grub' afterwards to update
# /boot/grub/grub.cfg.
# For full documentation of the options in this file, see:
#   info -f grub -n 'Simple configuration'

GRUB_DEFAULT=0
GRUB_TIMEOUT_STYLE=hidden
GRUB_TIMEOUT=0
GRUB_DISTRIBUTOR=`lsb_release -i -s 2> /dev/null || echo Debian`
GRUB_CMDLINE_LINUX_DEFAULT="quiet splash"
GRUB_CMDLINE_LINUX=""

# Uncomment to enable BadRAM filtering, modify to suit your needs
# This works with Linux (no patch required) and with any kernel that obtains
# the memory map information from GRUB (GNU Mach, kernel of FreeBSD ...)
#GRUB_BADRAM="0x01234567,0xfefefefe,0x89abcdef,0xefefefef"

# Uncomment to disable graphical terminal (grub-pc only)
#GRUB_TERMINAL=console

# The resolution used on graphical terminal
# note that you can use only modes which your graphic card supports via VBE
# you can see them in real GRUB with the command `vbeinfo'
#GRUB_GFXMODE=640x480

# Uncomment if you don't want GRUB to pass "root=UUID=xxx" parameter to Linux
#GRUB_DISABLE_LINUX_UUID=true

# Uncomment to disable generation of recovery mode menu entries
#GRUB_DISABLE_RECOVERY="true"

# Uncomment to get a beep at grub start
#GRUB_INIT_TUNE="480 440 1"
#Lets remove the quiet option so we can see this information whilst booting:

GRUB_CMDLINE_LINUX_DEFAULT="splash"

#Then the grub-mkconfig utility to compile the change:

root@user-virtual-machine:/etc/default# grub-mkconfig > /boot/grub/grub.cfg

Sourcing file `/etc/default/grub'
Sourcing file `/etc/default/grub.d/init-select.cfg'
Generating grub configuration file ...
Found linux image: /boot/vmlinuz-5.11.0-36-generic
Found initrd image: /boot/initrd.img-5.11.0-36-generic
Found linux image: /boot/vmlinuz-5.11.0-34-generic
Found initrd image: /boot/initrd.img-5.11.0-34-generic
Found memtest86+ image: /boot/memtest86+.elf
Found memtest86+ image: /boot/memtest86+.bin
done
When I reboot the Linux box, I know see tons of detail about the machine booting
#services and service status

user@user-virtual-machine:/etc/init.d$ service systemd-
systemd-ask-password-console
systemd-ask-password-plymouth
systemd-ask-password-wall
systemd-binfmt
systemd-boot-system-token
systemd-fsckd
systemd-fsck@dev-disk-by\x2duuid-0157\x2dCD82
systemd-fsck@dev-sdb1
systemd-fsck-root
systemd-hwdb-update
systemd-initctl
systemd-journald
systemd-journal-flush
systemd-logind
systemd-machine-id-commit
systemd-modules-load
systemd-networkd
systemd-pstore
systemd-quotacheck
systemd-random-seed
systemd-remount-fs
systemd-resolved
systemd-rfkill
systemd-sysctl
systemd-sysusers
systemd-timesyncd
systemd-tmpfiles-clean
systemd-tmpfiles-setup
systemd-tmpfiles-setup-dev
systemd-udevd
systemd-udev-trigger
systemd-update-utmp
systemd-update-utmp-runlevel
systemd-user-sessions

user@user-virtual-machine:/etc/init.d$ service systemd-networkd status
● systemd-networkd.service - Network Service
     Loaded: loaded (/lib/systemd/system/systemd-networkd.service; disabled; >
     Active: inactive (dead)
       Docs: man:systemd-networkd.service(8)
Run Levels
A runlevel is an operating state on a Unix and Unix-based operating system that is preset on the Linux-based system. Runlevels are numbered from zero to six.
Runlevels determine which programs can execute after the OS boots up. The runlevel defines the state of the machine after boot.
Can also be used on all systems, information that was collected on system boot
#dmesg example

user@user-virtual-machine:/$ dmesg | grep usb
[    0.914912] usbcore: registered new interface driver usbfs
[    0.914912] usbcore: registered new interface driver hub
[    0.914912] usbcore: registered new device driver usb
[    1.587391] usb usb1: New USB device found, idVendor=1d6b, idProduct=0002, bcdDevice= 5.11
[    1.587504] usb usb1: New USB device strings: Mfr=3, Product=2, SerialNumber=1
[    1.587597] usb usb1: Product: EHCI Host Controller
[    1.587663] usb usb1: Manufacturer: Linux 5.11.0-36-generic ehci_hcd
[    1.587743] usb usb1: SerialNumber: 0000:02:03.0
[    1.590269] usb usb2: New USB device found, idVendor=1d6b, idProduct=0001, bcdDevice= 5.11
[    1.590377] usb usb2: New USB device strings: Mfr=3, Product=2, SerialNumber=1
[    1.590469] usb usb2: Product: UHCI Host Controller
[    1.590535] usb usb2: Manufacturer: Linux 5.11.0-36-generic uhci_hcd
[    1.590614] usb usb2: SerialNumber: 0000:02:00.0
[    2.037967] usb 2-1: new full-speed USB device number 2 using uhci_hcd
[    2.038090] usb 1-1: new high-speed USB device number 2 using ehci-pci
Lesson 12: Managing the Boot Sequence
Default Runlevel or Boot Target
/etc/inittab – not on Ubuntu as I am using systemd (I assume!)
user@user-virtual-machine:/$ runlevel
N 5

#change runlevel on sysrtem5 / init system
init 5
#systemd system
user@user-virtual-machine:/usr/lib/systemd/system$ pwd
/usr/lib/systemd/system

#lets look at a random service:
user@user-virtual-machine:/usr/lib/systemd/system$ cat cups.service
[Unit]
Description=CUPS Scheduler
Documentation=man:cupsd(8)
After=sssd.service
Requires=cups.socket

[Service]
ExecStart=/usr/sbin/cupsd -l
Type=simple
Restart=on-failure

[Install]
Also=cups.socket cups.path
WantedBy=printer.target

#Notice this line within the service:
WantedBy=printer.target

#Lets now look at the target file for cups for example
user@user-virtual-machine:/usr/lib/systemd/system$ ls *target | grep print
printer.target

user@user-virtual-machine:/usr/lib/systemd/system$ cat printer.target
#  SPDX-License-Identifier: LGPL-2.1+
#
#  This file is part of systemd.
#
#  systemd is free software; you can redistribute it and/or modify it
#  under the terms of the GNU Lesser General Public License as published by
#  the Free Software Foundation; either version 2.1 of the License, or
#  (at your option) any later version.

[Unit]
Description=Printer
Documentation=man:systemd.special(7)
StopWhenUnneeded=yes
Just a bit more information on init runlevels and systemd with targets..
Changing Between Runlevels and Boot Targets using Single User Mode
Runlevels and targets mappingMore details on targets with Ubuntu / systemd
Shutting Down and Rebooting from the CLI
reboot

shutdown (Sander not a fan as too many options)

poweroff

init 0 (Run level 0)
init 6 (Reboot)
Alerting Users when making changes
wall **we are doing down**

#All users with an active terminal session / active network connection to server they won't get anything
Lesson 13: Install a Boot Manager
Providing Alternative Boot Locations and Backup Boot Options
fdisk -l /dev/sda

Active Partition with Boot info

Nomrally in an MBR or beginning of the hard disk

xxd -l 512 /dev/sda
GRUB is installed in the MBR
Installing and Configuring a Boot Loader such as GRUB
grub install

reboot to get into GRUB shell
Basic Configuration Changes to GRUB
GRUB1

/boot/grub/grub.conf
go back to this with CentOS..
Lesson 14: Managing Shared Libraries
What are Linux libraries? ‘A library is a collection of pre-compiled pieces of code called functions. The library contains common functions and together, they form a package called — a library. Functions are blocks of code that get reused throughout the program. Using the pieces of code again in a program saves time. It keeps the programmer from rewriting the code several times. For programmers, libraries provide reusable functions, data structures, classes and so forth’
In this post we will setup Cisco DMVPN. Hows does DMVPN work? From Cisco:
‘The Dynamic Multipoint VPN (DMVPN) feature combines GRE tunnels,IPsec encryption, and NHRP routing to provide users an ease of configuration via crypto profiles–which override the requirement for defining static crypto maps–and dynamic discovery of tunnel endpoints.
This feature relies on the following two Cisco enhanced standard technologies:
NHRP–A client and server protocol where the hub is the server and the spokes are the clients. The hub maintains an NHRP database of the public interface addresses of the each spoke. Each spoke registers its real address when it boots and queries the NHRP database for real addresses of the destination spokes to build direct tunnels.
mGRE Tunnel Interface –Allows a single GRE interface to support multiple IPsec tunnels and simplifies the size and complexity of the configuration.‘
crypto ipsec transform-set TRANSFORMSET esp-aes esp-sha-hmac
 mode transport
Configure IPSec profile on all devices:
crypto ipsec profile IPSECPROFILE
 set transform-set TRANSFORMSET
Configure Hub Tunnel1 Interface:
DMVPN-1#sh run int Tunnel 1
Building configuration...

Current configuration : 369 bytes
!
interface Tunnel1
 description Hub Tunnel
 bandwidth 1000
 ip address 172.16.3.1 255.255.255.0
 no ip redirects
 ip mtu 1400
 ip nhrp authentication cisco
 ip nhrp map multicast dynamic
 ip nhrp network-id 1
 ip nhrp holdtime 450
 ip tcp adjust-mss 1360
 tunnel source GigabitEthernet0/3
 tunnel mode gre multipoint
 tunnel protection ipsec profile IPSECPROFILE
end
Configure Spoke Tunnel Interfaces:
!HUB2

DMVPN-2#sh run int tunnel 2
Building configuration...

Current configuration : 422 bytes
!
interface Tunnel2
 description SPOKE
 bandwidth 1000
 ip address 172.16.3.2 255.255.255.0
 no ip redirects
 ip mtu 1400
 ip nhrp authentication cisco
 ip nhrp map 172.16.3.1 10.0.0.1
 ip nhrp map multicast 10.0.0.1
 ip nhrp network-id 2
 ip nhrp holdtime 450
 ip nhrp nhs 172.16.3.1
 ip tcp adjust-mss 1360
 tunnel source GigabitEthernet0/0
 tunnel mode gre multipoint
 tunnel protection ipsec profile IPSECPROFILE
end

!HUB3
DMVPN-3#sh run int tun3
Building configuration...

Current configuration : 422 bytes
!
interface Tunnel3
 description SPOKE
 bandwidth 1000
 ip address 172.16.3.3 255.255.255.0
 no ip redirects
 ip mtu 1400
 ip nhrp authentication cisco
 ip nhrp map 172.16.3.1 10.0.0.1
 ip nhrp map multicast 10.0.0.1
 ip nhrp network-id 3
 ip nhrp holdtime 450
 ip nhrp nhs 172.16.3.1
 ip tcp adjust-mss 1360
 tunnel source GigabitEthernet0/1
 tunnel mode gre multipoint
 tunnel protection ipsec profile IPSECPROFILE
end

!HUB4
DMVPN-4#sh run int tun4
Building configuration...

Current configuration : 422 bytes
!
interface Tunnel4
 description SPOKE
 bandwidth 1000
 ip address 172.16.3.4 255.255.255.0
 no ip redirects
 ip mtu 1400
 ip nhrp authentication cisco
 ip nhrp map 172.16.3.1 10.0.0.1
 ip nhrp map multicast 10.0.0.1
 ip nhrp network-id 4
 ip nhrp holdtime 450
 ip nhrp nhs 172.16.3.1
 ip tcp adjust-mss 1360
 tunnel source GigabitEthernet0/2
 tunnel mode gre multipoint
 tunnel protection ipsec profile IPSECPROFILE
end
Verify DMVPN
At this point we should have Tunnel interface reachability via the DMVPN network. All tunnels will have registered their addresses with the Hub via NHRP, therefore this addresses are available to the Spokes to dynamically build the required tunnels. Let’s confirm from Spoke 2 to Spoke4:
!Spoke 2 to Spoke 4 Tunnel Reachability Test

DMVPN-2#ping 172.16.3.4
Type escape sequence to abort.
Sending 5, 100-byte ICMP Echos to 172.16.3.4, timeout is 2 seconds:
!!!!!
Success rate is 100 percent (5/5), round-trip min/avg/max = 27/45/76 ms
Ok great so we can reach this destination, which means Spoke to Spoke connectivity is working via the DMVPN network. Let’s look at more verifications commands on Spoke 2:
! Spoke 2 NHRP

DMVPN-2#sh ip nhrp 172.16.3.4
172.16.3.4/32 via 172.16.3.4
   Tunnel2 created 00:01:35, expire 00:05:53
   Type: dynamic, Flags: router nhop
   NBMA address: 10.3.0.4

! 172.16.3.4 has a NHRP destination of 10.3.0.4 which is Spoke 4

! Spoke 2 to Spoke 4 DMVPN

MVPN-2#show dmvpn peer nbma 10.3.0.4
Legend: Attrb --> S - Static, D - Dynamic, I - Incomplete
	N - NATed, L - Local, X - No Socket
	T1 - Route Installed, T2 - Nexthop-override
	C - CTS Capable
	# Ent --> Number of NHRP entries with same NBMA peer
	NHS Status: E --> Expecting Replies, R --> Responding, W --> Waiting
	UpDn Time --> Up or Down Time for a Tunnel
==========================================================================

Interface: Tunnel2, IPv4 NHRP Details
Type:Unknown, NHRP Peers:1,

 # Ent  Peer NBMA Addr Peer Tunnel Add State  UpDn Tm Attrb
 ----- --------------- --------------- ----- -------- -----
     1 10.3.0.4             172.16.3.4    UP 00:04:07     D

! Spoke 2 to Spoke 4 ISAKMP Status

DMVPN-2#show crypto isakmp sa
IPv4 Crypto ISAKMP SA
dst             src             state          conn-id status
10.3.0.4        10.1.0.2        QM_IDLE           1005 ACTIVE
10.1.0.2        10.3.0.4        QM_IDLE           1004 ACTIVE

! Spoke 2 to Spoke 4 IPSec Status
DMVPN-2#show crypto ipsec sa

interface: Tunnel2
    Crypto map tag: Tunnel2-head-0, local addr 10.1.0.2

   protected vrf: (none)
   local  ident (addr/mask/prot/port): (10.1.0.2/255.255.255.255/47/0)
   remote ident (addr/mask/prot/port): (10.3.0.4/255.255.255.255/47/0)
   current_peer 10.3.0.4 port 500
     PERMIT, flags={origin_is_acl,}
    #pkts encaps: 1, #pkts encrypt: 1, #pkts digest: 1
    #pkts decaps: 1, #pkts decrypt: 1, #pkts verify: 1
    #pkts compressed: 0, #pkts decompressed: 0
    #pkts not compressed: 0, #pkts compr. failed: 0
    #pkts not decompressed: 0, #pkts decompress failed: 0
    #send errors 0, #recv errors 0

     local crypto endpt.: 10.1.0.2, remote crypto endpt.: 10.3.0.4
     plaintext mtu 1458, path mtu 1500, ip mtu 1500, ip mtu idb GigabitEthernet0/0
     current outbound spi: 0x18A60DF6(413535734)
     PFS (Y/N): N, DH group: none
Lets now check a packet capture on Spoke 2 and Spoke 4 to see this in action:
Indeed we can see these packets encapsulated inside ESP
Note the source and destination IP addresses are the transport / underlay addresses from Spoke 2 to Spoke 4. Therefore these packets are routed towards 10.3.0.4 using the routing table, with a next hop of the WAN / 10.1.0.1 as our transport:
DMVPN-2#sh ip route static
Codes: L - local, C - connected, S - static, R - RIP, M - mobile, B - BGP
       D - EIGRP, EX - EIGRP external, O - OSPF, IA - OSPF inter area
       N1 - OSPF NSSA external type 1, N2 - OSPF NSSA external type 2
       E1 - OSPF external type 1, E2 - OSPF external type 2
       i - IS-IS, su - IS-IS summary, L1 - IS-IS level-1, L2 - IS-IS level-2
       ia - IS-IS inter area, * - candidate default, U - per-user static route
       o - ODR, P - periodic downloaded static route, H - NHRP, l - LISP
       a - application route
       + - replicated route, % - next hop override, p - overrides from PfR

Gateway of last resort is 10.1.0.1 to network 0.0.0.0

S*    0.0.0.0/0 [1/0] via 10.1.0.1
Let’s now add the loopbacks into the mix on each spoke and also enable EIGRP to advertise these networks.
! Add Loopbacks to all Spokes (Not the Hub)

DMVPN-2#sh run int lo2
Building configuration...

Current configuration : 63 bytes
!
interface Loopback2
 ip address 2.2.2.2 255.255.255.255
end

DMVPN-3#sh run int lo3
Building configuration...

Current configuration : 63 bytes
!
interface Loopback3
 ip address 3.3.3.3 255.255.255.255
end

DMVPN-4#sh run int lo4
Building configuration...

Current configuration : 63 bytes
!
interface Loopback4
 ip address 4.4.4.4 255.255.255.255
end
! Enable EIGRP AS on all routers, advertise Tunnel network and Loopbacks

! EIGRP Hub (Tunnel overlay only)

router eigrp 100
 network 172.16.3.0 0.0.0.255

!EIGRP Spokes (Tunnel overlay and Loopbacks)

DMVPN-2#sh run | sec eigrp
router eigrp 100
 network 2.2.2.2 0.0.0.0
 network 172.16.3.0 0.0.0.255

DMVPN-3#sh run | sec eigrp
router eigrp 100
 network 3.3.3.3 0.0.0.0
 network 172.16.3.0 0.0.0.255

DMVPN-4#sh run | sec eigrp
router eigrp 100
 network 4.4.4.4 0.0.0.0
 network 172.16.3.0 0.0.0.255
Now as things stand with this configuration, we would face issues due to EIGRP default loop prevention mechanisms. The Hub will not advertise any EIGRP learned prefixes back out on the same interface due to split horizon, therefore we need to disable this on the Hub Tunnel interface to ensure routes are advertised to the Spokes:
! Disable Split Horizon on Hub Tunnel Interface

DMVPN-1#sh run int Tun1 | inc eigrp
 no ip split-horizon eigrp 100
With this in place our Spokes will now have routes advertised from the Hub. However… again as things stand now, the routing will be Spoke -> Hub -> Spoke, which we don’t really want.. we want traffic to pass via the Spoke to Spoke tunnels. How do we do this? Here is the answer on the Hubs tunnel interface:
DMVPN-1#sh run int Tun1 | inc eigrp
 no ip next-hop-self eigrp 100
As simple as that. 🙂 Without this in place, all routes are advertised to the spokes with the Hub as the next hop IP address. So how do the routes now look to the Spokes for the Loopback interfaces? Let’s see..
! Spoke 2 EIGRP routes

DMVPN-2#sh ip route eigrp
Codes: L - local, C - connected, S - static, R - RIP, M - mobile, B - BGP
       D - EIGRP, EX - EIGRP external, O - OSPF, IA - OSPF inter area
       N1 - OSPF NSSA external type 1, N2 - OSPF NSSA external type 2
       E1 - OSPF external type 1, E2 - OSPF external type 2
       i - IS-IS, su - IS-IS summary, L1 - IS-IS level-1, L2 - IS-IS level-2
       ia - IS-IS inter area, * - candidate default, U - per-user static route
       o - ODR, P - periodic downloaded static route, H - NHRP, l - LISP
       a - application route
       + - replicated route, % - next hop override, p - overrides from PfR

Gateway of last resort is 10.1.0.1 to network 0.0.0.0

      3.0.0.0/32 is subnetted, 1 subnets
D        3.3.3.3 [90/5248000] via 172.16.3.3, 00:16:36, Tunnel2
      4.0.0.0/32 is subnetted, 1 subnets
D        4.4.4.4 [90/5248000] via 172.16.3.4, 00:16:35, Tunnel2

! Spoke 3 EIGRP routes

DMVPN-3#sh ip route eigrp
Codes: L - local, C - connected, S - static, R - RIP, M - mobile, B - BGP
       D - EIGRP, EX - EIGRP external, O - OSPF, IA - OSPF inter area
       N1 - OSPF NSSA external type 1, N2 - OSPF NSSA external type 2
       E1 - OSPF external type 1, E2 - OSPF external type 2
       i - IS-IS, su - IS-IS summary, L1 - IS-IS level-1, L2 - IS-IS level-2
       ia - IS-IS inter area, * - candidate default, U - per-user static route
       o - ODR, P - periodic downloaded static route, H - NHRP, l - LISP
       a - application route
       + - replicated route, % - next hop override, p - overrides from PfR

Gateway of last resort is 10.2.0.1 to network 0.0.0.0

      2.0.0.0/32 is subnetted, 1 subnets
D        2.2.2.2 [90/5248000] via 172.16.3.2, 00:16:58, Tunnel3
      4.0.0.0/32 is subnetted, 1 subnets
D        4.4.4.4 [90/5248000] via 172.16.3.4, 00:16:56, Tunnel3

! Spoke 4 EIGRP routes

DMVPN-4#sh ip route eigrp
Codes: L - local, C - connected, S - static, R - RIP, M - mobile, B - BGP
       D - EIGRP, EX - EIGRP external, O - OSPF, IA - OSPF inter area
       N1 - OSPF NSSA external type 1, N2 - OSPF NSSA external type 2
       E1 - OSPF external type 1, E2 - OSPF external type 2
       i - IS-IS, su - IS-IS summary, L1 - IS-IS level-1, L2 - IS-IS level-2
       ia - IS-IS inter area, * - candidate default, U - per-user static route
       o - ODR, P - periodic downloaded static route, H - NHRP, l - LISP
       a - application route
       + - replicated route, % - next hop override, p - overrides from PfR

Gateway of last resort is 10.3.0.1 to network 0.0.0.0

      2.0.0.0/32 is subnetted, 1 subnets
D        2.2.2.2 [90/5248000] via 172.16.3.2, 00:17:17, Tunnel4
      3.0.0.0/32 is subnetted, 1 subnets
D        3.3.3.3 [90/5248000] via 172.16.3.3, 00:17:17, Tunnel4
Sure enough now each Loopback is routing directly to the Tunnel interface. 🙂
So in summary:
DMVPN up and working with Spoke to Spoke tunnels
All Tunnel interface addressing learned via NHRP
All Spoke to Spoke communication is logically point to point via the tunnel overlays
EIGRP split horizon disabled on Hub Tunnel
EIGRP next hop self disabled on Hub Tunnel
EIGRP learned routes advertised via Spoke to Spoke tunnel overlay
In this post we will verify as much as possible to nail the concepts of L3 MPLS VPN.
Scenario
Let’s verify the following:
Dunder Site 1 / CE1 access to Dunder Site 2 / CE2 (192.168.1.2/32)
Control Plane Learning
So we need to understand how Dunder Site 1 is firstly learning about prefix 192.168.1.2/32. Let’s look at this from the perspective of DunderCE1:
! DunderCE1 awareness of 192.168.1.2/32

DunderCE1>sh ip route 192.168.1.2
Routing entry for 192.168.1.2/32
  Known via "ospf 10", distance 110, metric 1
  Tag Complete, Path Length == 1, AS 65336, , type extern 2, forward metric 1
  Last update from 172.16.101.2 on GigabitEthernet0/0, 00:04:34 ago
  Routing Descriptor Blocks:
  * 172.16.101.2, from 172.16.101.2, 00:04:34 ago, via GigabitEthernet0/0
      Route metric is 1, traffic share count is 1
      Route tag 3489726264
Remember that this router is running OSPF with an neighbor to the PE:
DunderCE1#show ip ospf neighbor

Neighbor ID     Pri   State           Dead Time   Address         Interface
172.16.101.2      1   FULL/DR         00:00:36    172.16.101.2    GigabitEthernet0/0
So this is just good old IGP based learning with OSPF. Let’s now jump onto the PE itself:
! show ip route on R1-PE

R1-PE>show ip route 192.168.1.2
% Network not in table

! This will not work as we are using VRFs, therefore the command is:

! A reminder of the VRF names

R1-PE>show vrf
  Name                             Default RD            Protocols   Interfaces
  1:Dunder                         1.1.1.1:1             ipv4        Gi0/0
  2:Vance                          1.1.1.1:2             ipv4        Gi0/1

! Therefore we issue:

R1-PE>show ip route vrf 1:Dunder 192.168.1.2

Routing Table: 1:Dunder
Routing entry for 192.168.1.2/32
  Known via "bgp 65336", distance 200, metric 1, type internal
  Redistributing via ospf 10
  Advertised by ospf 10 subnets
  Last update from 5.5.5.5 00:07:14 ago
  Routing Descriptor Blocks:
  * 5.5.5.5 (default), from 5.5.5.5, 00:07:14 ago
      Route metric is 1, traffic share count is 1
      AS Hops 0
      MPLS label: 508
      MPLS Flags: MPLS Required
So in summary, R1-PE has awareness of 192.168.1.2/32 as part of the Dunder Mifflin VRF. In terms of the next hop address/control plane learning, let’s take a closer look at the output above:
! Route to 192.168.1.2 for Dunder VRF / tenant


R1-PE>show ip route vrf 1:Dunder 192.168.1.2

Routing Table: 1:Dunder
Routing entry for 192.168.1.2/32
  Known via "bgp 65336", distance 200, metric 1, type internal
  Redistributing via ospf 10
  Advertised by ospf 10 subnets
  Last update from 5.5.5.5 00:07:14 ago
  Routing Descriptor Blocks:
  * 5.5.5.5 (default), from 5.5.5.5, 00:07:14 ago
      Route metric is 1, traffic share count is 1
      AS Hops 0
      MPLS label: 508
      MPLS Flags: MPLS Required
A few points to make on this:
We are redistributing this prefix into OSPF process 10 (Which is running between the PE and CE)
We are learning about this prefix in BGP process 65336
The BGP neighbor that has advertised this prefix is 5.5.5.5
5.5.5.5 = R5-PE and is the update-source IP for BGP (which is why we see it!)
Our ‘next-hop’ is MPLS label 508
Note there is no IPv4 next hop! Therefore this router is using MPLS labels to forward the packet
We can dive a bit deeper also into BGP and review the VPNv4 routing detail:
R1-PE>show bgp vpnv4 unicast vrf 1:Dunder 192.168.1.2
BGP routing table entry for 1.1.1.1:1:192.168.1.2/32, version 10
Paths: (1 available, best #1, table 1:Dunder)
  Not advertised to any peer
  Refresh Epoch 1
  Local, imported path from 5.5.5.5:1:192.168.1.2/32 (global)
    5.5.5.5 (metric 5) (via default) from 5.5.5.5 (5.5.5.5)
      Origin incomplete, metric 1, localpref 100, valid, internal, best
      Extended Community: RT:5.5.5.5:1
      mpls labels in/out nolabel/508
      rx pathid: 0, tx pathid: 0x0
Again we see a reference to label 508 as our out label / way to reach this prefix. We also see our route target of 5.5.5.5:1, which we know is configured on R5-PE as a RT export to take the VRF routes OUT and put them into MP-BGP.
! CEF detail for this prefix

R1-PE>show ip cef vrf 1:Dunder 192.168.1.2
192.168.1.2/32
  nexthop 10.10.1.2 GigabitEthernet0/2 label 203() 508()
So the next hop is 10.10.1.2, but remember we are using labels to get there. The label mapping for 10.10.1.2 will be outbound label 203.
So on that note, let’s review our MPLS forwarding table and understand more about MPLS labels and mappings when it comes to labels 203 and 508:
Remember that R1-PE will only have label mappings for the next LSR in the path, being R2. There is no entry for label 508.
What about the MPLS forwarding table?
! MPLS forwarding table for next hop and destination prefix

! Destination prefix

R1-PE>show mpls forwarding-table
Local      Outgoing   Prefix           Bytes Label   Outgoing   Next Hop
Label      Label      or Tunnel Id     Switched      interface
101        Pop Label  2.2.2.2/32       0             Gi0/2      10.10.1.2
102        Pop Label  10.10.2.0/24     0             Gi0/2      10.10.1.2
103        203        5.5.5.5/32       0             Gi0/2      10.10.1.2
104        204        4.4.4.4/32       0             Gi0/2      10.10.1.2
105        205        3.3.3.3/32       0             Gi0/2      10.10.1.2
106        206        10.10.4.0/24     0             Gi0/2      10.10.1.2
107        207        10.10.3.0/24     0             Gi0/2      10.10.1.2
108        No Label   172.16.1.1/32[V] 0             Gi0/0      172.16.101.1
109        No Label   172.16.101.0/30[V]   \
                                       0             aggregate/1:Dunder
110        No Label   172.16.1.1/32[V] 0             Gi0/1      172.16.101.1
111        No Label   172.16.101.0/30[V]   \
                                       0             aggregate/2:Vance
You notice there is no entry for 192.168.1.2, and there won’t be as it is not part of LDP. Also there is no label entry for 508. So how is this working?
Well the BGP peer / update source came from R5-PE, the MPLS forwarding table has an entry for this via out label 203. How do we get to label 203? Via 10.10.1.2:
! CEF detail for this prefix

R1-PE>show ip cef vrf 1:Dunder 192.168.1.2
192.168.1.2/32
  nexthop 10.10.1.2 GigabitEthernet0/2 label 203() 508()
Now we understand this between DunderCE1 and R1-PE, the expected behaviour between R1-PE and the next LSR in the path which is R2 is similar. We would see the same behaviour. Label mappings etc… but this time no VPNV4 routes as they are exchanged directly between R1-PE and R5-PE.
So what does R2 actually do here to reach prefix 192.168.1.2/32? Let’s take a look at a pcap between R1-PE and R2. Let’s send a ping from DunderCE1 to 192.168.1.2/32:
DunderCE1>ping 192.168.1.2
Type escape sequence to abort.
Sending 5, 100-byte ICMP Echos to 192.168.1.2, timeout is 2 seconds:
!!!!!
Success rate is 100 percent (5/5), round-trip min/avg/max = 10/12/18 ms
Let’s look at the pcap. Firstly the 1st ICMP request we sent:
You can see the local label of 203, which is the outgoing label from the perspective of R1-PE and the local label from the perspective of R2.
!R1-PE LDP mapping for 5.5.5.5/32

R1-PE#show mpls forwarding-table
Local      Outgoing   Prefix           Bytes Label   Outgoing   Next Hop
Label      Label      or Tunnel Id     Switched      interface
103        203        5.5.5.5/32       0             Gi0/2      10.10.1.2
Now the label of the last route in the path is still 508, which will be the local label of 508. So how does R2 now forward the packet? Well the destination prefix is 192.168.1.2 still, so let’s check the control plane detail. Let’s firstly look at the OUTBOUND interface on R2 and perform a capture there. Let’s do the same ping from DunderCE and look at the capture on Gig0/1 on R2:
Here is the 1st ICMP packet. You can see the labels as well, with label 304 being referenced. Which we know is a local label on R3. Let’s check label mappings on R2 to confirm:
! MPLS table on R2

R2# show mpls forwarding-table
Local      Outgoing   Prefix           Bytes Label   Outgoing   Next Hop
Label      Label      or Tunnel Id     Switched      interface
203        304        5.5.5.5/32       8414          Gi0/1      10.10.2.3
So again the label 304 is used to reach prefix 5.5.5.5/32 and the next hop is 10.10.2.3. How does the router reach 10.10.2.3? Well this is via the next hop interface of Gig0/1 connected to R3.
You can see the pattern here and how this is behaving. Essentially we want to reach 192.168.1.2/32, which is known to R5 via 5.5.5.5/32 which is participating in LDP. To reach this prefix we will therefore be using labels / LDP control plane. What about the other way? Let’s check an ICMP reply in the pcap on R2 Gig0/1:
Check the labels. To go back to 172.16.101.1 (Dunder-CE1) the label 109 is used, now we know this is R1-PE as we set this router to use this custom label range. R2s local label is 202 which makes sense. We only ever know about label mappings between the 2 directly connected routers. Our goal is of course to reach the last label in the path and therefore the target prefix.
Let’s fast forward to R4 and check the mappings:
! R4 mappings

R4>show mpls forwarding-table
Local      Outgoing   Prefix           Bytes Label   Outgoing   Next Hop
Label      Label      or Tunnel Id     Switched      interface
402        Pop Label  5.5.5.5/32       9915          Gi0/2      10.10.4.5
Notice there is no outgoing label and to reach prefix 5.5.5.5/32 use the next hop of 10.10.4.5 but with no outgoing label. This is because R4 is the penultimate hop before the destination.
Let’s check a pcap on R4 gig0/2 to R5-PE and generate the same ping from Dunder-CE1:
ICMP request out towards destination:
This time we only see the label 508 being locally significant to R5-PE, the label for R4 is popped. Let’s double check this concept on R4:
Note there is no label present as this is the penultimate hop before the final destination. Hence it is not present in the packet above.
ICMP response from 192.168.1.2:
As this traffic is going back towards the source of the ping, the labels are complete with the final label in the path being label 109 over at R1-PE and the local label on R4 being 406.
So in summary again, we know that our destination is learned via MP-BGP coming from 5.5.5.5 with a label of 508. However we are forwarded to 5.5.5.5 using LDP labels, they are locally significant between each router. Each label will have a mapping to a real IPv4 next hop address, which is directly connected between each neighbour.
Just to finish up with how OSPF across the backbone fits and looks with all of this. For example on R2:
R2>show ip route ospf
Codes: L - local, C - connected, S - static, R - RIP, M - mobile, B - BGP
       D - EIGRP, EX - EIGRP external, O - OSPF, IA - OSPF inter area
       N1 - OSPF NSSA external type 1, N2 - OSPF NSSA external type 2
       E1 - OSPF external type 1, E2 - OSPF external type 2
       i - IS-IS, su - IS-IS summary, L1 - IS-IS level-1, L2 - IS-IS level-2
       ia - IS-IS inter area, * - candidate default, U - per-user static route
       o - ODR, P - periodic downloaded static route, H - NHRP, l - LISP
       a - application route
       + - replicated route, % - next hop override, p - overrides from PfR

Gateway of last resort is not set

      1.0.0.0/32 is subnetted, 1 subnets
O        1.1.1.1 [110/2] via 10.10.1.1, 01:04:54, GigabitEthernet0/2
      3.0.0.0/32 is subnetted, 1 subnets
O        3.3.3.3 [110/2] via 10.10.2.3, 01:04:44, GigabitEthernet0/1
      4.0.0.0/32 is subnetted, 1 subnets
O        4.4.4.4 [110/3] via 10.10.2.3, 01:04:44, GigabitEthernet0/1
      5.0.0.0/32 is subnetted, 1 subnets
O        5.5.5.5 [110/4] via 10.10.2.3, 01:04:44, GigabitEthernet0/1
      10.0.0.0/8 is variably subnetted, 6 subnets, 2 masks
O        10.10.3.0/24 [110/2] via 10.10.2.3, 01:04:44, GigabitEthernet0/1
O        10.10.4.0/24 [110/3] via 10.10.2.3, 01:04:44, GigabitEthernet0/1
OSPF as our underlay still exists and provides valid IGP reachability to each loopback and each /24 network running between each router. But remember again, OSPF has no knowledge of 192.168.1.2/32 as this is a VPNv4 route in MP-BGP, however OSPF does have knowledge of the various Loopbacks and the associated next hop IPv4 address for example. Remember OSPF is there to facilitate the LDP neighbor relationships. Without it none of this would work and we would have no label exchange or awareness.
Just to remind us on R1-PE:
! LDP neighbor on R1-PE to R2

R1-PE>show mpls ldp neighbor
    Peer LDP Ident: 2.2.2.2:0; Local LDP Ident 1.1.1.1:0
        TCP connection: 2.2.2.2.43197 - 1.1.1.1.646
        State: Oper; Msgs sent/rcvd: 89/90; Downstream
        Up time: 01:09:03
        LDP discovery sources:
          GigabitEthernet0/2, Src IP addr: 10.10.1.2
        Addresses bound to peer LDP Ident:
          10.10.2.2       2.2.2.2         10.10.1.2
So R1-PE needs to have reachability / control plane awareness of 2.2.2.2/32 over on R2, via the next hop of 10.10.2.2 which this awareness is provided by our good friend OSPF:
! OSPF routing on R1-PE for 10.10.2.2 and 2.2.2.2

R1-PE#show ip route ospf
Codes: L - local, C - connected, S - static, R - RIP, M - mobile, B - BGP
       D - EIGRP, EX - EIGRP external, O - OSPF, IA - OSPF inter area
       N1 - OSPF NSSA external type 1, N2 - OSPF NSSA external type 2
       E1 - OSPF external type 1, E2 - OSPF external type 2
       i - IS-IS, su - IS-IS summary, L1 - IS-IS level-1, L2 - IS-IS level-2
       ia - IS-IS inter area, * - candidate default, U - per-user static route
       o - ODR, P - periodic downloaded static route, H - NHRP, l - LISP
       a - application route
       + - replicated route, % - next hop override, p - overrides from PfR

Gateway of last resort is not set

      2.0.0.0/32 is subnetted, 1 subnets
O        2.2.2.2 [110/2] via 10.10.1.2, 01:12:20, GigabitEthernet0/2
      3.0.0.0/32 is subnetted, 1 subnets
O        3.3.3.3 [110/3] via 10.10.1.2, 01:12:10, GigabitEthernet0/2
      4.0.0.0/32 is subnetted, 1 subnets
O        4.4.4.4 [110/4] via 10.10.1.2, 01:12:10, GigabitEthernet0/2
      5.0.0.0/32 is subnetted, 1 subnets
O        5.5.5.5 [110/5] via 10.10.1.2, 01:12:10, GigabitEthernet0/2
      10.0.0.0/8 is variably subnetted, 5 subnets, 2 masks
O        10.10.2.0/24 [110/2] via 10.10.1.2, 01:12:10, GigabitEthernet0/2
O        10.10.3.0/24 [110/3] via 10.10.1.2, 01:12:10, GigabitEthernet0/2
O        10.10.4.0/24 [110/4] via 10.10.1.2, 01:12:10, GigabitEthernet0/2
Both with a next hop address of 10.10.1.2 over on R2.
So there we have had our Layer 3 MPLS journey is over. Good times!
In this lab we will cover the required route redistribution to take customer routes from our VRFs and inject them into MP-BGP.
This will enable each tenant to have knowledge of the subnets at each customer site. We will use the Loopback interfaces at each site to prove success of the configuration.
Configuration – Export
! Mutual Redistribution on R1-PE

! Export OSPF routes from Dunder VRF into MP-BGP

R1-PE#sh run | sec bgp
router bgp 65336

 address-family ipv4 vrf 1:Dunder
  redistribute ospf 10
 exit-address-family
So we are ‘injecting’ OSPF routes for the VRF 1:Dunder into BGP. The OSPF route we are interested in on DunderCE1 is 172.16.1.1/32, so if this is successful, this route will appear on R5-PE in it’s BGP table. Let’s see!
! Verify that R5 has knowledge of the 172.16.1.1/32 prefix, which is directly connected to the DunderCE1 router

R5-PE#sh ip route vrf 1:Dunder bgp

Routing Table: 1:Dunder
Codes: L - local, C - connected, S - static, R - RIP, M - mobile, B - BGP
       D - EIGRP, EX - EIGRP external, O - OSPF, IA - OSPF inter area
       N1 - OSPF NSSA external type 1, N2 - OSPF NSSA external type 2
       E1 - OSPF external type 1, E2 - OSPF external type 2
       i - IS-IS, su - IS-IS summary, L1 - IS-IS level-1, L2 - IS-IS level-2
       ia - IS-IS inter area, * - candidate default, U - per-user static route
       o - ODR, P - periodic downloaded static route, H - NHRP, l - LISP
       a - application route
       + - replicated route, % - next hop override, p - overrides from PfR

Gateway of last resort is not set

      172.16.0.0/16 is variably subnetted, 2 subnets, 2 masks
B        172.16.1.1/32 [200/2] via 1.1.1.1, 00:03:28
B        172.16.101.0/30 [200/0] via 1.1.1.1, 00:03:28
! Further verify vpnv4 routes on R1

R1-PE#show ip bgp vpnv4 rd 1.1.1.1:1
BGP table version is 11, local router ID is 1.1.1.1
Status codes: s suppressed, d damped, h history, * valid, > best, i - internal,
              r RIB-failure, S Stale, m multipath, b backup-path, f RT-Filter,
              x best-external, a additional-path, c RIB-compressed,
Origin codes: i - IGP, e - EGP, ? - incomplete
RPKI validation codes: V valid, I invalid, N Not found

     Network          Next Hop            Metric LocPrf Weight Path
Route Distinguisher: 1.1.1.1:1 (default for vrf 1:Dunder)
 *>  172.16.1.1/32    172.16.101.1             2         32768 ?
 *>  172.16.101.0/30  0.0.0.0                  0         32768 ?

! Verify labels on R1

R1-PE#show ip bgp vpnv4 rd 1.1.1.1:1 labels
   Network          Next Hop      In label/Out label
Route Distinguisher: 1.1.1.1:1 (1:Dunder)
   172.16.1.1/32    172.16.101.1    100/nolabel
   172.16.101.0/30  0.0.0.0         108/nolabel(1:Dunder)

or...

R1-PE#show bgp vpnv4 unicast rd 1.1.1.1:1 labels
   Network          Next Hop      In label/Out label
Route Distinguisher: 1.1.1.1:1 (1:Dunder)
   172.16.1.1/32    172.16.101.1    100/nolabel
   172.16.101.0/30  0.0.0.0         108/nolabel(1:Dunder)

or...

R1-PE#show bgp vpnv4 unicast vrf 1:Dunder labels
   Network          Next Hop      In label/Out label
Route Distinguisher: 1.1.1.1:1 (1:Dunder)
   172.16.1.1/32    172.16.101.1    100/nolabel
   172.16.101.0/30  0.0.0.0         108/nolabel(1:Dunder)


! MPLS Forwarding Table on R1 for this prefix

R1-PE#show mpls forwarding-table vrf 1:Dunder
Local      Outgoing   Prefix           Bytes Label   Outgoing   Next Hop
Label      Label      or Tunnel Id     Switched      interface
100        No Label   172.16.1.1/32[V] 0             Gi0/0      172.16.101.1
108        No Label   172.16.101.0/30[V]   \
                                       0             aggregate/1:Dunder
Quite a few verification commands available to us for this. So our one-way route redistribution for Dunder Mifflin between both PE routers using MP-BGP is successful.
Now that is the mutual redistribution complete on R1 and we now need to do all tasks again this time over on R5. 🙂
! Redistribution for Dunder Mifflin on R5

! RIP into BGP

R5-PE(config)#router bgp 65336
R5-PE(config-router)#address-family ipv4 vrf 1:Dunder
R5-PE(config-router-af)#redistribute rip

! BGP into RIP

R5-PE#sh run | sec rip
router rip
 version 2
 !
 address-family ipv4 vrf 1:Dunder
  redistribute bgp 65336 metric 5
  network 192.168.202.0
  no auto-summary
 exit-address-family
  redistribute rip

! Redistribution for Vance on R5

**This is actually not required, as R5 is running eBGP with VanceCE2. We will verify all routes shortly
Verify
Ok so at this point we have implemented the required configuration on R1 and R5 for both tenants and their 2 sites. Now let us verify for the following prefixes advertised at each customer site.
Dunder Mifflin Prefixes
! Prefix advertised from DunderCE1 (OSPF)

DunderCE1#sh run int Lo1
Building configuration...

Current configuration : 85 bytes
!
interface Loopback1
 ip address 172.16.1.1 255.255.255.255
 ip ospf 10 area 0
end

! Can we see the prefix at DunderCE2?

DunderCE2>sh ip route 172.16.1.1
Routing entry for 172.16.1.1/32
  Known via "rip", distance 120, metric 5
  Redistributing via rip
  Last update from 192.168.202.2 on GigabitEthernet0/0, 00:00:15 ago
  Routing Descriptor Blocks:
  * 192.168.202.2, from 192.168.202.2, 00:00:15 ago, via GigabitEthernet0/0
      Route metric is 5, traffic share count is 1

! Can we reach this network?

DunderCE2>ping 172.16.1.1
Type escape sequence to abort.
Sending 5, 100-byte ICMP Echos to 172.16.1.1, timeout is 2 seconds:
!!!!!
Success rate is 100 percent (5/5), round-trip min/avg/max = 10/12/16 ms

! Prefix advertised from DunderCE2 (RIP)

DunderCE2#sh run int Lo0
Building configuration...

Current configuration : 67 bytes
!
interface Loopback0
 ip address 192.168.1.2 255.255.255.255
end

! Can we see the prefix at DunderCE1?

DunderCE1#sh ip route 192.168.1.2
Routing entry for 192.168.1.2/32
  Known via "ospf 10", distance 110, metric 1
  Tag Complete, Path Length == 1, AS 65336, , type extern 2, forward metric 1
  Last update from 172.16.101.2 on GigabitEthernet0/0, 00:07:10 ago
  Routing Descriptor Blocks:
  * 172.16.101.2, from 172.16.101.2, 00:07:10 ago, via GigabitEthernet0/0
      Route metric is 1, traffic share count is 1
      Route tag 3489726264

! Can we reach this network?

DunderCE1#ping 192.168.1.2
Type escape sequence to abort.
Sending 5, 100-byte ICMP Echos to 192.168.1.2, timeout is 2 seconds:
!!!!!
Success rate is 100 percent (5/5), round-trip min/avg/max = 10/12/19 ms
So we have complete success for the Dunder Mifflin tenant and the prefixes at each site. Let’s now do the same for Vance Refrigeration.
! Prefix advertised from VanceCE1 (EIGRP)

VanceCE1#sh run int Lo0
Building configuration...

Current configuration : 66 bytes
!
interface Loopback0
 ip address 172.16.1.1 255.255.255.255
end

! Can we see the prefix at VanceCE2?

VanceCE2>sh ip route 172.16.1.1
Routing entry for 172.16.1.1/32
  Known via "bgp 65337", distance 20, metric 0
  Tag 65336, type external
  Last update from 192.168.202.2 00:23:39 ago
  Routing Descriptor Blocks:
  * 192.168.202.2, from 192.168.202.2, 00:23:39 ago
      Route metric is 0, traffic share count is 1
      AS Hops 1
      Route tag 65336
      MPLS label: none

! Can we reach this network?

VanceCE2>ping 172.16.1.1
Type escape sequence to abort.
Sending 5, 100-byte ICMP Echos to 172.16.1.1, timeout is 2 seconds:
!!!!!
Success rate is 100 percent (5/5), round-trip min/avg/max = 10/15/28 ms

! Prefix advertised from VanceCE2 (BGP)

VanceCE2#sh run int Lo0
Building configuration...

Current configuration : 67 bytes
!
interface Loopback0
 ip address 192.168.1.2 255.255.255.255
end

! Can we see the prefix at VanceCE1?

VanceCE1#sh ip route 192.168.1.2
Routing entry for 192.168.1.2/32
  Known via "eigrp 10", distance 170, metric 2560000512
  Tag 65337, type external
  Redistributing via eigrp 10
  Last update from 172.16.101.2 on GigabitEthernet0/1, 00:15:48 ago
  Routing Descriptor Blocks:
  * 172.16.101.2, from 172.16.101.2, 00:15:48 ago, via GigabitEthernet0/1
      Route metric is 2560000512, traffic share count is 1
      Total delay is 20 microseconds, minimum bandwidth is 1 Kbit
      Reliability 1/255, minimum MTU 1 bytes
      Loading 1/255, Hops 1
      Route tag 65337

! Can we reach this network?

VanceCE1#ping 192.168.1.2
Type escape sequence to abort.
Sending 5, 100-byte ICMP Echos to 192.168.1.2, timeout is 2 seconds:
!!!!!
Success rate is 100 percent (5/5), round-trip min/avg/max = 11/11/12 ms
Wow so we have complete success of all routing and reachability for each tenant across the network! In the next post we will go deeper with verification and bring in the concepts around our route targets and MPLS labels.
! BGP configuration on R5 - Bob Vance Site 2 (eBGP as using different AS each end - this is important to understand as we already have a BGP process running on the PE R5)

R5-PE(config)#router bgp 65336
R5-PE(config-router)#address-family ipv4 vrf 2:Vance
R5-PE(config-router-af)#neighbor 192.168.202.1 remote-as 65337

! Tell R1 that next hop is R5 and not Vance Site 2 (Default eBGP behaviour)


R5-PE(config-router-af)#router bgp 65336
R5-PE(config-router)#neighbor 1.1.1.1 next-hop-self
Let’s just summarize the BGP setup on R5, as this is a bit confusing as it is already running BGP to R1 and is now also running BGP to R5 with eBGP:
So out local BGP AS is 65336 and our customer is running AS 65337, therefore an eBGP peer between the PE and CE router.
CE to PE Configuration – CE Routers
No fancy configuration required here! Just simple routing setups on the CE routers as they do not need to know what is going on beyond the PE. (Much like the real world)
OSPF
! Configure DunderCE1 Interface and OSPF

DunderCE1#sh run int GigabitEthernet 0/0
Building configuration...

Current configuration : 136 bytes
!
interface GigabitEthernet0/0
 ip address 172.16.101.1 255.255.255.252
 ip ospf 10 area 0
 duplex auto
 speed auto
 media-type rj45
end


! Verify OSPF Neighbors

DunderCE1#sh ip ospf neighbor

Neighbor ID     Pri   State           Dead Time   Address         Interface
172.16.101.2      1   FULL/DR         00:00:32    172.16.101.2 GigabitEthernet0/0

R1-PE#sh ip ospf neighbor 172.16.101.1
 Neighbor 172.16.101.1, interface address 172.16.101.1
    In the area 0 via interface GigabitEthernet0/0
    Neighbor priority is 1, State is FULL, 6 state changes
    DR is 172.16.101.2 BDR is 172.16.101.1
    Options is 0x12 in Hello (E-bit, L-bit)
    Options is 0x52 in DBD (E-bit, L-bit, O-bit)
    LLS Options is 0x1 (LR)
    Dead timer due in 00:00:37
    Neighbor is up for 00:01:02
    Index 1/1/1, retransmission queue length 0, number of retransmission 0
    First 0x0(0)/0x0(0)/0x0(0) Next 0x0(0)/0x0(0)/0x0(0)
    Last retransmission scan length is 0, maximum is 0
    Last retransmission scan time is 0 msec, maximum is 0 msec
EIGRP
! Configure VanceCE1 Interface and EIGRP

VanceCE1#sh run interface gigabitEthernet 0/1
Building configuration...

Current configuration : 119 bytes
!
interface GigabitEthernet0/1
 ip address 172.16.101.1 255.255.255.252
 duplex auto
 speed auto
 media-type rj45
end

VanceCE1#sh run | sec eigrp
router eigrp 10
 network 172.16.0.0

! Verify EIGRP Neighbors


VanceCE1#sh ip eigrp neighbors
EIGRP-IPv4 Neighbors for AS(10)
H   Address                 Interface              Hold Uptime   SRTT   RTO  Q  Seq
                                                   (sec)         (ms)       Cnt Num
0   172.16.101.2            Gi0/1                    14 00:00:13   18   108  0  1

R1-PE#sh ip eigrp vrf 2:Vance neighbors
EIGRP-IPv4 Neighbors for AS(10) VRF(2:Vance)
H   Address                 Interface              Hold Uptime   SRTT   RTO  Q  Seq
                                                   (sec)         (ms)       Cnt Num
0   172.16.101.1            Gi0/1                    11 00:00:54    8   100  0  1
RIP
! Interface and RIP Configuration on DunderCE2

DunderCE2#sh run int gigabitEthernet 0/0
Building configuration...

Current configuration : 120 bytes
!
interface GigabitEthernet0/0
 ip address 192.168.202.1 255.255.255.252
 duplex auto
 speed auto
 media-type rj45
end

! Loopback 0 for the purpose of proving RIP is working to R5

DunderCE2#sh run int Loopback0
Building configuration...

Current configuration : 67 bytes
!
interface Loopback0
 ip address 192.168.1.2 255.255.255.255
end

! RIP on DunderCE2

DunderCE2#sh run | sec rip
router rip
 version 2
 network 0.0.0.0
 no auto-summary

! Verify R5 RIP - all OK

R5-PE#sh ip route vrf 1:Dunder

Routing Table: 1:Dunder
Codes: L - local, C - connected, S - static, R - RIP, M - mobile, B - BGP
       D - EIGRP, EX - EIGRP external, O - OSPF, IA - OSPF inter area
       N1 - OSPF NSSA external type 1, N2 - OSPF NSSA external type 2
       E1 - OSPF external type 1, E2 - OSPF external type 2
       i - IS-IS, su - IS-IS summary, L1 - IS-IS level-1, L2 - IS-IS level-2
       ia - IS-IS inter area, * - candidate default, U - per-user static route
       o - ODR, P - periodic downloaded static route, H - NHRP, l - LISP
       a - application route
       + - replicated route, % - next hop override, p - overrides from PfR

Gateway of last resort is not set

      192.168.1.0/32 is subnetted, 1 subnets
R        192.168.1.2 [120/1] via 192.168.202.1, 00:00:21, GigabitEthernet0/0
      192.168.202.0/24 is variably subnetted, 2 subnets, 2 masks
C        192.168.202.0/30 is directly connected, GigabitEthernet0/0
L        192.168.202.2/32 is directly connected, GigabitEthernet0/0
BGP
! Interface and BGP Configuration on VanceCE2

VanceCE2#sh run int gig0/1
Building configuration...

Current configuration : 120 bytes
!
interface GigabitEthernet0/1
 ip address 192.168.202.1 255.255.255.252
 duplex auto
 speed auto
 media-type rj45
end

! eBGP on VanceCE2

VanceCE2#sh run | sec bgp
router bgp 65337
 bgp log-neighbor-changes
 neighbor 192.168.202.2 remote-as 65336

! Verify eBGP Neighbor to R5

VanceCE2#sh ip bgp neighbors
BGP neighbor is 192.168.202.2,  remote AS 65336, external link
  BGP version 4, remote router ID 5.5.5.5
  BGP state = Established, up for 00:44:05
So the CE to PE configuration is in place and looking good. One thing we need to do is ensure the Loopback interfaces are in on each CE, as these are what we will use to prove success of this overall lab when we finish!
! Loopbacks on each CE Router

! OSPF

DunderCE1#sh run int Lo1
Building configuration...

Current configuration : 85 bytes
!
interface Loopback1
 ip address 172.16.1.1 255.255.255.255
 ip ospf 10 area 0
end

! EIGRP

VanceCE1#sh run int Lo0
Building configuration...

Current configuration : 66 bytes
!
interface Loopback0
 ip address 172.16.1.1 255.255.255.255
end

VanceCE1#sh run | sec eigrp
router eigrp 10
 network 172.16.0.0


! RIP

DunderCE2#sh run int Lo0
Building configuration...

Current configuration : 67 bytes
!
interface Loopback0
 ip address 192.168.1.2 255.255.255.255
end

DunderCE2#sh run | sec rip
router rip
 version 2
 network 0.0.0.0
 no auto-summary

! BGP (Redistribution used to redistribute connected Lo0 interface into BGP)

VanceCE2#sh run int Lo0
Building configuration...

Current configuration : 67 bytes
!
interface Loopback0
 ip address 192.168.1.2 255.255.255.255
end

VanceCE2#sh run | section bgp
router bgp 65337
 bgp log-neighbor-changes
 redistribute connected
 neighbor 192.168.202.2 remote-as 65336
So at this stage the PE routers R1 and R5 should know about the Loopback interfaces inside each routing domain. Let’s check to be sure:
!R1 customer routes (OSPF and EIGRP)

R1-PE#sh ip route vrf 1:Dunder

Routing Table: 1:Dunder
Codes: L - local, C - connected, S - static, R - RIP, M - mobile, B - BGP
       D - EIGRP, EX - EIGRP external, O - OSPF, IA - OSPF inter area
       N1 - OSPF NSSA external type 1, N2 - OSPF NSSA external type 2
       E1 - OSPF external type 1, E2 - OSPF external type 2
       i - IS-IS, su - IS-IS summary, L1 - IS-IS level-1, L2 - IS-IS level-2
       ia - IS-IS inter area, * - candidate default, U - per-user static route
       o - ODR, P - periodic downloaded static route, H - NHRP, l - LISP
       a - application route
       + - replicated route, % - next hop override, p - overrides from PfR

Gateway of last resort is not set

      172.16.0.0/16 is variably subnetted, 3 subnets, 2 masks
O        172.16.1.1/32 [110/2] via 172.16.101.1, 00:06:08, GigabitEthernet0/0
C        172.16.101.0/30 is directly connected, GigabitEthernet0/0
L        172.16.101.2/32 is directly connected, GigabitEthernet0/0

R1-PE#sh ip route vrf 2:Vance

Routing Table: 2:Vance
Codes: L - local, C - connected, S - static, R - RIP, M - mobile, B - BGP
       D - EIGRP, EX - EIGRP external, O - OSPF, IA - OSPF inter area
       N1 - OSPF NSSA external type 1, N2 - OSPF NSSA external type 2
       E1 - OSPF external type 1, E2 - OSPF external type 2
       i - IS-IS, su - IS-IS summary, L1 - IS-IS level-1, L2 - IS-IS level-2
       ia - IS-IS inter area, * - candidate default, U - per-user static route
       o - ODR, P - periodic downloaded static route, H - NHRP, l - LISP
       a - application route
       + - replicated route, % - next hop override, p - overrides from PfR

Gateway of last resort is not set

      172.16.0.0/16 is variably subnetted, 3 subnets, 2 masks
D        172.16.1.1/32
           [90/130816] via 172.16.101.1, 00:05:37, GigabitEthernet0/1
C        172.16.101.0/30 is directly connected, GigabitEthernet0/1
L        172.16.101.2/32 is directly connected, GigabitEthernet0/1
      192.168.1.0/32 is subnetted, 1 subnets
B        192.168.1.2 [200/0] via 5.5.5.5, 00:03:04
      192.168.202.0/30 is subnetted, 1 subnets
B        192.168.202.0 [200/0] via 5.5.5.5, 00:03:04

!R5 customer routes (RIP and BGP)

R5-PE#sh ip route vrf 1:Dunder

Routing Table: 1:Dunder
Codes: L - local, C - connected, S - static, R - RIP, M - mobile, B - BGP
       D - EIGRP, EX - EIGRP external, O - OSPF, IA - OSPF inter area
       N1 - OSPF NSSA external type 1, N2 - OSPF NSSA external type 2
       E1 - OSPF external type 1, E2 - OSPF external type 2
       i - IS-IS, su - IS-IS summary, L1 - IS-IS level-1, L2 - IS-IS level-2
       ia - IS-IS inter area, * - candidate default, U - per-user static route
       o - ODR, P - periodic downloaded static route, H - NHRP, l - LISP
       a - application route
       + - replicated route, % - next hop override, p - overrides from PfR

Gateway of last resort is not set

      192.168.1.0/32 is subnetted, 1 subnets
R        192.168.1.2 [120/1] via 192.168.202.1, 00:00:25, GigabitEthernet0/0
      192.168.202.0/24 is variably subnetted, 2 subnets, 2 masks
C        192.168.202.0/30 is directly connected, GigabitEthernet0/0
L        192.168.202.2/32 is directly connected, GigabitEthernet0/0

R5-PE#sh ip route vrf 2:Vance

Routing Table: 2:Vance
Codes: L - local, C - connected, S - static, R - RIP, M - mobile, B - BGP
       D - EIGRP, EX - EIGRP external, O - OSPF, IA - OSPF inter area
       N1 - OSPF NSSA external type 1, N2 - OSPF NSSA external type 2
       E1 - OSPF external type 1, E2 - OSPF external type 2
       i - IS-IS, su - IS-IS summary, L1 - IS-IS level-1, L2 - IS-IS level-2
       ia - IS-IS inter area, * - candidate default, U - per-user static route
       o - ODR, P - periodic downloaded static route, H - NHRP, l - LISP
       a - application route
       + - replicated route, % - next hop override, p - overrides from PfR

Gateway of last resort is not set

      192.168.1.0/32 is subnetted, 1 subnets
B        192.168.1.2 [20/0] via 192.168.202.1, 00:04:38
      192.168.202.0/24 is variably subnetted, 2 subnets, 2 masks
C        192.168.202.0/30 is directly connected, GigabitEthernet0/1
L        192.168.202.2/32 is directly connected, GigabitEthernet0/1
Looking good on the PE, so with the CE work done we are at the end of this lab. In our next lab we will put the icing on the cake and enter the world of redistribution and vpnv4 routes.
**The vrf forwarding command will remove the IP Address from the applied interface, therefore you will need to reapply the IP address detail again before proceeding.
Verify
! Verify VRF setups on R1 and R5! show vrf
R1-PE#show vrf
Name Default RD Protocols Interfaces
1:Dunder 1.1.1.1:1 ipv4 Gi0/0
2:Vance 1.1.1.1:2 ipv4 Gi0/1
R5-PE#show vrf
Name Default RD Protocols Interfaces
1:Dunder 5.5.5.5:1 ipv4 Gi0/0
2:Vance 5.5.5.5:2 ipv4 Gi0/1
! show ip route vrf 1:Dunder
R1-PE#show ip route vrf 1:Dunder
Routing Table: 1:Dunder
Codes: L - local, C - connected, S - static, R - RIP, M - mobile, B - BGP
D - EIGRP, EX - EIGRP external, O - OSPF, IA - OSPF inter area
N1 - OSPF NSSA external type 1, N2 - OSPF NSSA external type 2
E1 - OSPF external type 1, E2 - OSPF external type 2
i - IS-IS, su - IS-IS summary, L1 - IS-IS level-1, L2 - IS-IS level-2
ia - IS-IS inter area, * - candidate default, U - per-user static route
o - ODR, P - periodic downloaded static route, H - NHRP, l - LISP
a - application route
+ - replicated route, % - next hop override, p - overrides from PfR
Gateway of last resort is not set
172.16.0.0/16 is variably subnetted, 2 subnets, 2 masks
C 172.16.101.0/30 is directly connected, GigabitEthernet0/0
L 172.16.101.2/32 is directly connected, GigabitEthernet0/0
R5-PE#show ip route vrf 1:Dunder
Routing Table: 1:Dunder
Codes: L - local, C - connected, S - static, R - RIP, M - mobile, B - BGP
D - EIGRP, EX - EIGRP external, O - OSPF, IA - OSPF inter area
N1 - OSPF NSSA external type 1, N2 - OSPF NSSA external type 2
E1 - OSPF external type 1, E2 - OSPF external type 2
i - IS-IS, su - IS-IS summary, L1 - IS-IS level-1, L2 - IS-IS level-2
ia - IS-IS inter area, * - candidate default, U - per-user static route
o - ODR, P - periodic downloaded static route, H - NHRP, l - LISP
a - application route
+ - replicated route, % - next hop override, p - overrides from PfR
Gateway of last resort is not set
192.168.202.0/24 is variably subnetted, 2 subnets, 2 masks
C 192.168.202.0/30 is directly connected, GigabitEthernet0/0
L 192.168.202.2/32 is directly connected, GigabitEthernet0/0
! show ip route vrf 2:Vance
R1-PE#show ip route vrf 2:Vance
Routing Table: 2:Vance
Codes: L - local, C - connected, S - static, R - RIP, M - mobile, B - BGP
D - EIGRP, EX - EIGRP external, O - OSPF, IA - OSPF inter area
N1 - OSPF NSSA external type 1, N2 - OSPF NSSA external type 2
E1 - OSPF external type 1, E2 - OSPF external type 2
i - IS-IS, su - IS-IS summary, L1 - IS-IS level-1, L2 - IS-IS level-2
ia - IS-IS inter area, * - candidate default, U - per-user static route
o - ODR, P - periodic downloaded static route, H - NHRP, l - LISP
a - application route
+ - replicated route, % - next hop override, p - overrides from PfR
Gateway of last resort is not set
172.16.0.0/16 is variably subnetted, 2 subnets, 2 masks
C 172.16.101.0/30 is directly connected, GigabitEthernet0/1
L 172.16.101.2/32 is directly connected, GigabitEthernet0/1
R5-PE#show ip route vrf 2:Vance
Routing Table: 2:Vance
Codes: L - local, C - connected, S - static, R - RIP, M - mobile, B - BGP
D - EIGRP, EX - EIGRP external, O - OSPF, IA - OSPF inter area
N1 - OSPF NSSA external type 1, N2 - OSPF NSSA external type 2
E1 - OSPF external type 1, E2 - OSPF external type 2
i - IS-IS, su - IS-IS summary, L1 - IS-IS level-1, L2 - IS-IS level-2
ia - IS-IS inter area, * - candidate default, U - per-user static route
o - ODR, P - periodic downloaded static route, H - NHRP, l - LISP
a - application route
+ - replicated route, % - next hop override, p - overrides from PfR
Gateway of last resort is not set
192.168.202.0/24 is variably subnetted, 2 subnets, 2 masks
C 192.168.202.0/30 is directly connected, GigabitEthernet0/1
L 192.168.202.2/32 is directly connected, GigabitEthernet0/1
So in summary we have our VRFs in place for each tenant on each PE router. Also our route target import/export values and our unique route distinguishers are in place. Currently each VRF on each router only is aware of directly connected networks.
In the next few lab we will bring in the CE to PE routing to bring customer routes into the VRF.
! Enable extended community support on R1 / R5

R1-PE(config-router-af)#do sh run | sec bgp
router bgp 65336
 bgp log-neighbor-changes
 neighbor 5.5.5.5 remote-as 65336
 neighbor 5.5.5.5 update-source Loopback0
 !
 address-family vpnv4
  neighbor 5.5.5.5 activate
  neighbor 5.5.5.5 send-community extended
 exit-address-family


R5-PE(config-router-af)#do sh run | sec bgp
router bgp 65336
 bgp log-neighbor-changes
 neighbor 1.1.1.1 remote-as 65336
 neighbor 1.1.1.1 update-source Loopback0
 !
 address-family vpnv4
  neighbor 1.1.1.1 activate
  neighbor 1.1.1.1 send-community extended
 exit-address-family
**In my lab the router added the extended support after I activated the neighbor in the vpnv4 address family.
Verify
! Verify BGP neighbors / capabilities

R1-PE#show ip bgp neighbors | section cap
    1 active, is not multisession capable (disabled)
  Neighbor capabilities:
    Route refresh: advertised and received(new)
    Four-octets ASN Capability: advertised and received
    Address family IPv4 Unicast: advertised and received
    Address family VPNv4 Unicast: advertised and received
    Enhanced Refresh Capability: advertised and received
    Multisession Capability:
    Stateful switchover support enabled: NO for session 1
Option Flags: nagle, path mtu capable

R5-PE#show ip bgp neighbors | section cap
    1 active, is not multisession capable (disabled)
  Neighbor capabilities:
    Route refresh: advertised and received(new)
    Four-octets ASN Capability: advertised and received
    Address family IPv4 Unicast: advertised and received
    Address family VPNv4 Unicast: advertised and received
    Enhanced Refresh Capability: advertised and received
    Multisession Capability:
    Stateful switchover support enabled: NO for session 1
Option Flags: nagle, path mtu capable
In the next lab we will start looking at our VRFs for out tenants.
Ok so let’s remove the MPLS configuration from R1, then reapply it with a pcap running:
! Current MPLS configuration on R1

mpls ip
mpls label range 100 199

! That's it now let's remove this (Leave the labels)

no mpls ip

! LDP neighbor down

*May 17 13:13:03.575: %LDP-5-NBRCHG: LDP Neighbor 2.2.2.2:0 (1) is DOWN (LDP unconfigured globally)
Let’s now reapply and look at the pcap.
Neighbor discovery
Simple enough this is done via Multicast and anyone listening in group 224.0.0.2 will respond to the source.
Source is from R1 to 224.0.0.2 and the response is from the LDP transport address of R2 with a TCP handshake, followed by packet 71 initializing LDP:
There is a response to this packet with an initialization message sent this time from R2 to R1 (Packet 73)
Now this is the conversation I really wanted to see. So beyond the hellos with UDP transport, we now see TCP based communication between R1 and R2 using their Loopback Transport IPv4 addresses:
Source Port 26444
Destination Port: 646 (Still)
Label Mapping Exchange
Each router will exchange (and ACK via TCP) a Label Mapping Message:
R2 Label Mapping Message:
1st Label Mapping Message from R2:
2nd Label Mapping Message from R2:
Another advising on 5.5.5.5/32 prefix from R5: (Via R2)
So what we are seeing here are the prefixes from R2, sent to R1, but what about the labels themselves? Well 1stly let’s check the label mappings actually on R1 for 5.5.5.5/32:
! LDP Binding for 5.5.5.5/32 on R1

R1-PE#show mpls ldp bindings 5.5.5.5 32
  lib entry: 5.5.5.5/32, rev 10
        local binding:  label: 103
        remote binding: lsr: 2.2.2.2:0, label: 203
So my local label is 103 and my remote label is 203, but where is this in the capture?
Here is the answer within the ‘Generic Label’:
You can see the binary value, which when you work out 11001011 is actually 203 in decimal! In a similar way each router is advising it’s connected LDP of prefixes and associated labels.

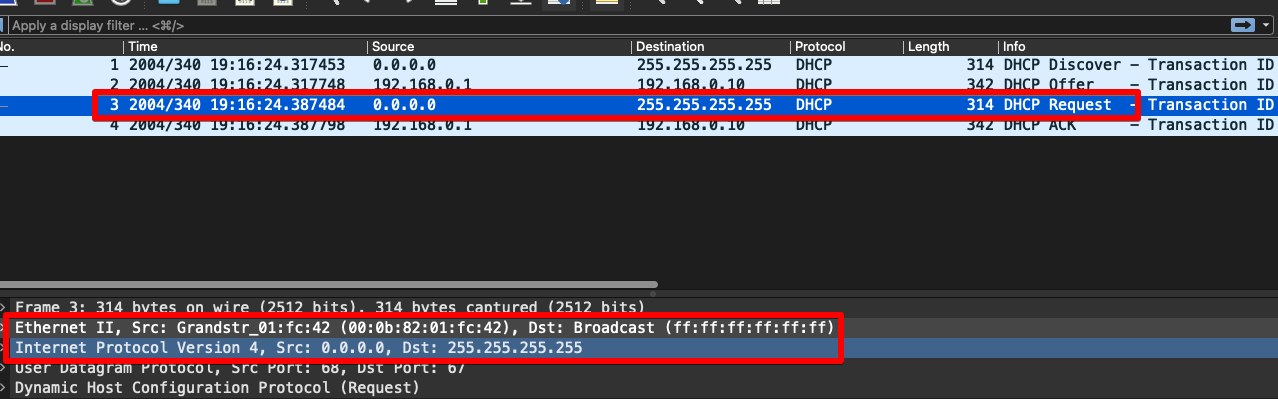


You must be logged in to post a comment.